I am a big fan of Sigma lenses after having shot a feature last year using the 18 – 35mm and 50 – 100 mm T2 High Speed Cine Zooms in some arduous and challenging conditions on the ocean off of the Cape of Good Hope.
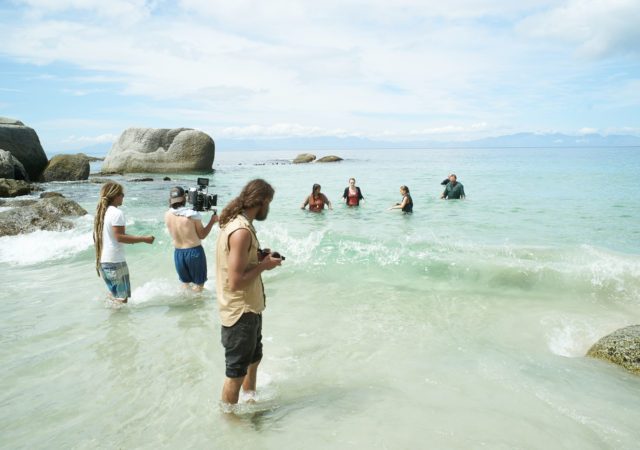
When I had an opportunity to use Sigma High Speed FF Cine Primes for our movie MONSTER ISLAND I jumped at the chance. MONSTER ISLAND is Syfy channel’s giant kaiju movie and features a bevy of creatures encountered by a deep ocean mining crew who must figure out how to stop them before they wreak havoc on the mainland. We filmed the movie in South Africa utilizing the spectacular landscapes of Cederberg and the environs around Cape Town to bring our story to life.
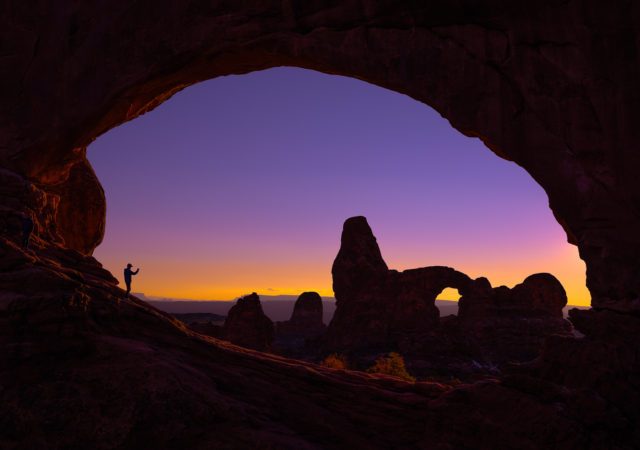
I arrived in Moab, Utah two days ago to attend and teach during the 1st annual Nightscaper conference where some of the greatest night photographers have gathered to share our common passion under the dark, starry skies of Moab.
Over the last 6 years of teaching in Moab, I have noticed a lot of big changes happening. Many more lodging facilities have been built and with this comes increased tourism and activity in the area. Why wouldn’t anyone want to come to Moab? After all it’s home to both Canyonlands and Arches National Park as well as many other areas that are ideal for outdoor recreation. The weather is good and on a moonless night the skies are super dark in Arches and even darker over in Canyonlands.
This has been a summer of fun and exploration. Going to different places, and seeing things with new eyes makes me feel alive. I was lucky enough to have a Sigma 24-35mm F2 Art lens along for the ride. This lens is so versatile, I was able to shoot beautiful landscapes at the beach and close-ups of flowers.
Negative space…no its not the place in your head where you second guess your photographic composition and/or lens choice and/or exposure settings and/or enter general anxiety here. The simplest explanation of negative space that I can think of is that it is any space in your photograph that is not the intended subject. Or as Wiki puts it “is the space around and between the subject(s) of an image.” For editorial photographers the negative space of an image can be incredibly important and can make or break an image for publication.
When you are sent out on assignment or are asked for a stock submission you may get some request like, “mind the gutter”, or “right read two page opener” or better yet “cover please!” All of these requests are basically code for negative space and how they want that space to be organized. When you are out shooting, you should keep these negative spaces in mind. Below are a few example of how negative space is used in editorial photography.
Mind the Gutter- Just like it sounds, the gutter is where the left and right pages meet in the middle of the magazine and art directors generally will not want to place the subject of the image within the gutter. If the subject is centered then they may make the image a ¾ spread and put text in the left or right column depending which way the image was placed
Right (or left) read two page opener- Be prepared to keep you subject and the action confined to one side of an image. Often you will find that a story opens as a two-page spread photograph with the copy on the right side and the action/subject on the left and sometimes the other way around. Continue reading Negative Space for Editorial Photography using Sigma Lenses
Editor’s Note: This article primarily features the SIGMA 24-35mm F2 DG HSM | Art lens, which has since been discontinued from SIGMA’s Art lineup.
Aquariums present a number of challenges for photographers hoping to make keepsake photos of a visit to view undersea animals. Between the dim lighting conditions, highly reflective surfaces, and active subjects, it can be a recipe for disappointment. Here are some tips and tricks to up the odds of landing a winning shot of sharks and other aquatic animals the next time you visit the aquarium.
Pack a fast-aperture wide angle lens
For my visit to the Adventure Aquarium, I chose the SIGMA 24-35mm F2 DG HSM | Art lens as my go-to lens for almost all the photos in this piece. The wide-angle field of view and very fast F2 aperture allowed for fast shutter speeds in the ever-changing interior lighting conditions both inside and outside the giant tanks.
The SIGMA 24-35mm F2 is the world’s first F2 full-frame zoom lens.
Choose the highest ISO you are comfortable with on your camera, and shoot RAW plus JPG
The High ISO performance on modern DSLRs, combined with very smart noise reduction, particularly when shooting RAW and using a leading Raw Converter like Adobe Camera Raw or Lightroom, has opened up new possibilities for imaging. Be sure to have an sense of how your DSLR and chosen RAW converter can work together for sharp, high-ISO images with minimized noise. I chose to cap my ISO at 1600 on my 6D for these photos, knowing I might be doing some aggressive post-processing to gain up the exposures and tone down the chrominance noise.
1/80 F2 ISO 800 at 24mm.I chose ISO 800 and ISO 1600 as my highest ISOs on the 6D, based on my experience with the camera’s performance in low-light conditions and Adobe Camera Raw’s Noise reduction processes. No NR has been applied here to this shot.
Consider Metered Manual Exposure mode
Depending on the exhibit, the proper or best exposure can vary significantly from what a metered program mode is determining it to be. Even when you switch to manual exposure mode, the meter keeps on working, and is visible through the viewfinder. Use this as a baseline, and set a manual exposure based on a test shot, and then review the histogram and adjust shutter speed and ISO up or down accordingly. Too slow a shutter speed will allow for camera shake and subject movement blur, too fast an exposure will dramatically underexpose a scene. But modern DSLRs have much greater latitude, and being a few stops underexposed isn’t as dreadful now as it was a decade ago.
The exposure for these small jellyfish was 1/1000 at F2 at ISO 800.And these larger jellyfish, the very next tank over, the best exposure was 1/50 at F2 at ISO 800. Metered manual, combined with quick LCD/Histogram inspection is very helpful in changing, challenging lighting conditions.
Skip the polarizer
Normally, it makes sense to use a polarizer to cut glare, but with the thick “glass” of an aquarium, which may be glass, or might be acrylic, the overall loss of light associated with a highly effective polarizing angle usually doesn’t make much sense.
Manage reflections if you can’t avoid them entirely
Take it as a given that you won’t be able to totally avoid some reflections and glare; but make sure anything glaring is away from the main subject and focus point of the image. A slight change of angle or position can very easily put a reflection right on top of your subject, or move it to the edge, or even out of frame.
And then, if you want, use healing tools and cloning brushes to sweep them away, when possible.
Or use the reflections and lights as design elements. For example, here the sea turtle, rays, and sharks are all positioned around the reflections of rooflights over the giant tank.
A polarizer filter wouldn’t have done much to tame these wild reflections and the shutter was at a very slow 1/40 second as it was, so I incorporated the lighting reflections into the composition. Adding a polarizer would have dropped the shutter speed to 1/20 or 1/13, wouldn’t have wholly cut the glare, and allowed for subject movement blur.The red spots in the water are from an emergency exit sign, reflecting into the frame from somewhere.A couple touches with the healing brush in Adobe Camera Raw sweeps these right away.
Frame the Photo with people for Scale
Stand a little ways back from a large viewing window into a tank and wait for a large sea creature to swim between or above some of the silhouetted people in the foreground to give a sense of scale and place to the scene.
Stepping back from one of the biggest observation windows allowed me to frame the silhouettes of fellow visitors along with the animals. I waited ’til a shark swam through the scene to make this shot. There’s a tiny bit of motion blur at 1/40 second at ISO 400 at F2 at 35mm on the 24-35mm F2, but as far as an atmospheric shot, it works for me.
Look for anything unusual or eye catching, and try a shot, even if it might not work
I head a loud croak behind me and saw an educator holding up an African bullfrog in a small demo area. It wasn’t what I was expecting, but I was able to get up close and make a quick photo.
1/60 F2 ISO 640.I cropped in to make the frog the only focal point of this image.
The Giant isopods, on the other hand; were a serious challenge. They were in a darkened area, with dim light, and even with an open-top tank, I wasn’t able to get a pleasing shot of these gigantic pillbug cousins in their small, dim touch tank in between a sea of other visitors. Not every shot is going to be a winner.
Dim lighting, crowded conditions and moving subjects meant I just could not get a sharp enough shot of the giant deep-sea isopods. Wow, these things are big!
Accept that not every shot is going to be a winner
I missed a lot of shots on my recent visit, mostly of the smaller, fast-moving fish. It just wasn’t meant to be. And the pair of hippos were not active near the underwater viewing areas on all three occasions I stopped in on my most recent visit. So despite having the right lens, the right camera, and right settings, I couldn’t get a head-on shot of either hippopotamus through the water.
The hippos were very camera-shy on my most recent visit. Despite the right exposure, relatively uncrowded conditions, the subjects were just not active near the viewing windows while I was there. I got as close to the glass as possible to minimize reflections of other aquarium attendees.1/80 F4 ISO 800.Since I couldn’t get the underwater shot of the hippos I’d hoped for, I went to a different angle, and switched to the 24-105mm F4 DG HSM | Art lens to get in closer. That F4 aperture is slower than the F2 of the 24-35mm, so I activated OS, and adjusted my shutter speeds accordingly. I paid special attention to the reflections off the glass to make sure that a handrail behind me was out of frame. In my first shot from here, it was covering the hippo’s face, and was quite distracting. Moving just slightly allowed me to eliminate that distraction.
Skip on-board Flash, Especially through glass
Flash isn’t a good idea when shooting through thick glass. It will create hotspots, confound the metering, and probably won’t illuminate anything inside the tanks. And if you are shooting from above into touch tanks or otherwise open tanks, it can cause unwanted glare and reflections off the water surface.
Firing the flash isn’t the way to go. Here it reflects off the curved wall of the tunnel, and all we’ve got is an underexposed shot with a hotspot.And then when you do try to tweak the exposure, there’s a big glare right on top of the glass, right where the focal point of this frame should be.
Try panning
If you are tracking the swimming of an animal on the other side of the glass, be sure to keep the motion of the camera consistent as it passes nearest to you as you fire the shutter button, particularly when the shutter speed is slower than 1/100 of a second in conditions like this. Matching the camera’s motion to the swimming motion can mean the difference between sharp edges on a moving subject and motion blur.
1/80 F2 ISO 800 with the 24-35mm F2 at 24mm.Track the camera as larger animals swim past you. Focus on the subject as you are following it; and keep the camera moving through the exposure to minimize subject motion effects in the frame. As you can see, we are moving in the same direction of the sharp, opposite direction of the small fish here.
Prefocus when at a distance
When you know that the focal distance is hyperfocal, prefocus and turn off Autofocus, so you can fire the shutter without the lens trying to refocus. For example, I was about thirty five feet from this very large “theatre” window, and with the 24-35mm F2, that is well into the far end of the focal range, so anything inside the tank will be focused at infinity. So once focus was determinined, I switched off AF so that I could fire the shutter as soon something interesting happened “on screen.”
1/50 F2 ISO 800.Prefocusing from a distance allows the camera to be ready once the subject enters the frame.
Remember that you don’t own the place
Try to remember that you don’t own the place, and that there are many other guests who have also paid admission to view the undersea creatures. You’ll see them reflected in the glass, in the corners of your frames, and so on. Crop them out if you can, try to minimize the reflections of people in the glass through creative RAW processing (AUTO processing in situations with high glare and low light has a tendency to produce terrible output images.)
And remember, a lot of the kids you’ll see may be at the aquarium for the very first time. Don’t be “that photographer.” Wait your turn, take your turn, and move on. Unless you’ve booked the place all for yourself and paid a steep rental fee for the privilege, don’t monopolize the best viewing spots for excessive periods of time.
Use Noise Reduction during processing
Lean heavily on Noise Reduction in image toning. It can do wonders to smooth out the noise in the colors and really make your images stronger.
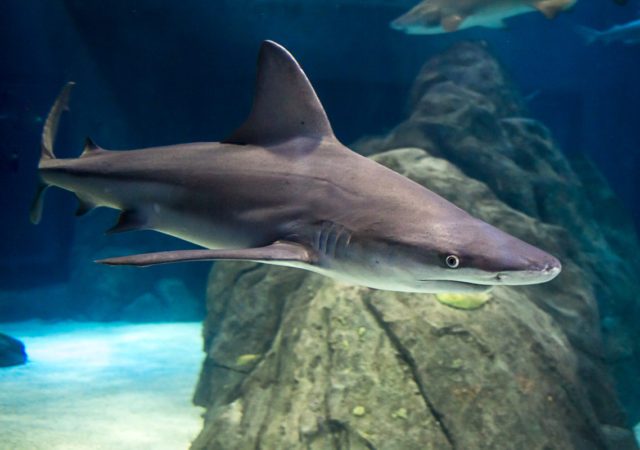
Here is my start-to-finish toning work on this image. I deliberately underexposed slightly to ensure action-freezing shutter speed of 1/80 as the shark swam towards me at an angle.Using Adobe Camera Raw’s main interface, I adjusted exposure, clarity, whites, blacks, and so on.I sharpened the edges slightly, while applying pretty aggressive noise reduction to smooth the noise in the image, paying particular attention to the skin of the shark during this process.Some minor adjustments were made using HSL controls to add yellow luminance to make the shark pop more from the rocks.The healing brush was used to get rid of the hot blue/cyan reflections near the shark’s tail. Then the image was saved out of ACR as a web-optimized JPEG.
Be Ready for Anything!
Just before a scheduled appearance at the big theatre window, Scuba Santa made the rounds of all the windows and viewing areas on the other sides of the giant tank. He popped right up in front of us and we were all very surprised. My camera was at the ready to catch this rare undersea creature!
Keep mental notes of your varied manual exposures for certain viewing spots, and be ready for anything! You never know when something very photogenic is going to swim right past your window!
It has been another banner year here at Sigma, between product announcements, awards, and events from coast to coast! Here are the most popular blog postings in 2015!
Our first look at the 24-35mm F2 DG HSM | Art, the world’s first full-frame F2 zoom lens, was the most popular blog posting of the year!
Our hands-on with the world’s first F2 full-frame zoom lens was far and away the most popular posting of the year!
Helen Chandler is owner of Whistling Wolf Farm, a transitional organic farm in Pittstown, NJ. She was kind enough to pose for an environmental portrait at a local farmer’s market. (www.whistlingwolffarm.com) 1/180 F2 ISO 100 at 35mm with Canon 580EX flash with diffuser down, -1 1/3 FEC.
Loaded with great birding photography by Sigma Pro Roman Kurywczak, this first look at the 150-600mm F5-6.3 DG OS HSM | Contemporary lens got a ton of positive feedback from our fans!
Our hands-on first look at the 24mm F1.4 DG HSM | Art was incredibly popular as well. Fans really seem to love our first look hands-on reports on the newest Sigma Global Vision lenses!
30 second exposure of the Brooklyn Bridge a F/11 ISO 100 by Patrick Santucci on the Canon 6D.
The 20mm F1.4 DG HSM | Art, the world’s first F1.4 20mm ultrawide prime was the most recently published article in this list, but quickly rose in the rankings!
Hotel Room 2717 at the Courtyard Marriott Times Square West offers a fantastic view of the Empire State Building. I squeezed the camera and lens out the tiny window opening, braced it against the window frame, and fired several variations on this shot showing the street, the buildings, and the moon. I had a camera strap around my neck as well, just in case! 1/2000 F3.5 ISO 2000.
Editor’s Picks
Here is a bonus sampling of great blog postings you may have missed this year, hand-selected by the editors of the Sigma blog.
By Stan Trzoniec
As an outdoor writer / photographer working for close to a dozen monthly publications and books, I’m always looking for new equipment to do my job better. One of the newer items to cross my path is this incredible Sigma 24-35mm f/2 DG HSM “Art” lens for my full frame Nikon D3 series to D4s pro cameras. With New England my beat, I recently used it in the beginning and during this extra colorful fall season. A week in Vermont proved the lens is exceptional with reference to clarity, sharpness and color rivaling that of the high priced optics.
1. On a placid lake in New Hampshire the fog from the neighboring mountain helped bring this photo to life. 1/50th of a second, f/ 3.5 ISO 100 @ 35mm.
Sigma Art lenses are renowned for razor-sharp detail on the focal plane, even at widest apertures. It seems simple, enough, doesn’t it? If you are buying a very fast aperture lens, you will want to take advantage of the extra light-gathering power, not just for the through-the viewfinder experience, but also for the on-the-sensor feel of an F1.4, F1.8 or F2 aperture, whether in dim lighting situations to keep ISOs low, or simply for the aesthetic that a very shallow focal plane offers and how the foreground and background are rendered.
A raindrop hangs from a leaf as seen through the Sigma 50mm F1.4 DG HSM | Art lens wide open at F1.4. 1/200 F1.4 ISO 400 on a Canon EOS 6D. The focal point is sharp and crisp, while the depth of field is ridiculously shallow.
The laws of optical physics do insist that every lens will be a bit sharper overall when the aperture is stopped down slightly, and the same holds true for Sigma Art lenses. This is most noticeable on test targets, which, honestly, are one of the most boring photo subjects ever. In real world situations, Sigma Art lenses are growing more legendary each day for the total imaging performance this gear delivers, whether wide open, or stopped down a touch.
Razor thin focus on a hibiscus flower, which is mirrored in color by the red umbrellas blurred in the background. Sigma 24-35mm F2 DG HSM | Art wide open at F2 at 35mm on the 6D. 1/1000 at F2.0 ISO 100
The Sigma 24-35mm F2 DG HSM | Art is the world’s first full-frame zoom lens with a constant F2 maximum aperture, and its 1.45x zoom range manages to bridge three of the most popular wide angle fixed focal lengths for lenses: 24mm, 28mm and 35mm. The zoom range is subtle, but the compositional effects are noticeable as the smooth zoom ring shifts the field of view from 24mm through to 35mm. The lens is now shipping with a $999 street price.
An earring hangs on a display rod at an artisan’s market. 1/800 F2 ISO 100 at 35mm on a Canon EOS 6D. All images here are converted from CR2 RAW to highest quality JPEG in Adobe Camera RAW 9, with light tonal adjustments. No lens correction applied to any photo, because this lens is too new to be in the Adobe Lens Profile database.
It is an Art lens—it is designed first and foremost with an eye and intention on total image quality. The build, heft, and hand feel is completely in line with the others in the Art stable. At 33.2 ounces with a 3.4 inch diameter barrel that’s 4.8 inches long without lens hood, it is slightly larger than the 18-35 F1.8 DC HSM | Art lens, due to the larger, full-frame imaging circle.
A reverse-angle variation of the above, again at 35mm. Same tech specs as above.