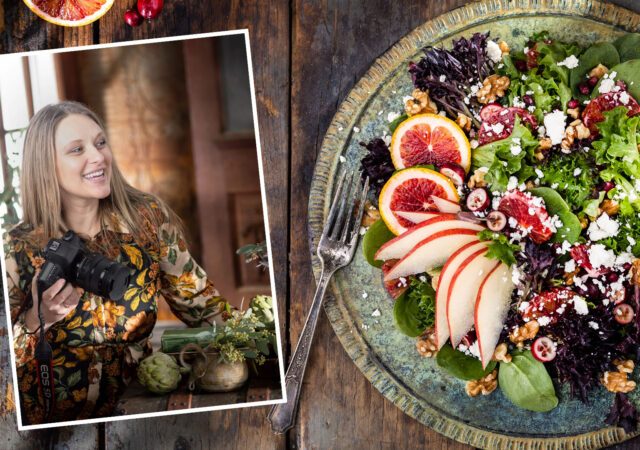
Creating Magazine-Worthy Food Photography with SIGMA Lenses

If you’re someone who enjoys browsing through cookbooks, food magazines, or restaurant menus, you surely have noticed the importance of food photography in capturing your attention. But what is it that sets a magazine spread apart from say, food photography on packaging? Editorial food photography is a type of food photography that emphasizes the storytelling aspect of food. It’s a way to bring the viewer in and sell them on more than just the food, but a feeling and the whole culinary experience so you can feel like you were there or excite you to recreate the experience for yourself.

But your images don’t have to end up in a magazine to take a page out of the editorial food photography book. (Let’s be honest, we all secretly want to be on the cover of our favorite food mag, right?) Editorial food photography is less about where the images are published and more about the stories they tell and the connections they create. By leaning into the story, editorial food photography appeals to our imagination and invites us to linger a little longer before turning the page.

I believe that everyone, from hobbyist to professional, can add an editorial flare to their food photography. With the principles of editorial food photography, and at least two types of camera lenses, you can capture everything from the bread and butter to the intangible dishes brought to the table: kindness, generosity, happiness, and love. So in collaboration with SIGMA, we conducted a virtual workshop full of food photography tips to show you how!

Want to watch the full virtual workshop? Check it out here.

My Food Photography Gear


Capturing the Hero Image with a 40mm Prime Lens

We wanted to go all-out, telling the story of a holiday meal with a showstopping first course: a bountiful winter salad. Our graphic designer created templates for a four-page magazine spread, complete with the recipe, flavor text, and headings. This way, we were able to compose our image with the magazine layout in mind. In fact, we imported the template as an overlay in Lightroom so we could see exactly how it would look in the finished product.

Want to try it? Download our free Canva template and overlay files (courtesy of Little Rusted Ladle)

When I want to focus on storytelling while photographing food (which is a lot) I make sure to use multiple types of camera lenses. I tend to favor prime lenses over zoom lenses, but both have their strengths. Using more than one prime lens helps me capture the highest quality, widest variety of images from a single shoot.

I can get a wide angle of the whole set to establish an environment and then switch to macro food photography for the smaller, more delicate features of the dish. This results in an abundance of content and a fuller picture of the scene.

To start, we set up our hero shot. In our layout, this image would likely end up as the cover and/or the first page of our magazine spread. To capture the whole atmosphere of our holiday feast we mounted our camera overhead with the SIGMA 40mm F1.4 DG HSM | Art lens attached.

The 40mm is a moderate wide-angle lens which gives you a wider field of view and helps capture the environment or setting in which the food is being served without the camera having to be super far away. The silverware, jar of vinaigrette, and red pear and cranberry fizz all add to the festive place setting, allowing the viewer to imagine the rest of the holiday table.

With the help of our overlay, strategic areas of the composition are left open to accommodate text. It’s a win-win in editorial food photography, because the text will be clean and legible, and we won’t lose any of our composition or vibrancy to a scrim or other graphic design to be able to read the article.

We also styled a spray of fresh ingredients to help fill out the frame, continue the color themes, and increase appetite appeal. Obviously, If this were my real holiday table, I wouldn’t have the fruit spread out like this. But part of the joy of editorial photography is its freedom from realism. Were this my real holiday table, I may have arranged a centerpiece of red pears, pomegranates, blood oranges, and cranberries. To tell the story I was reaching for in this one frame, we chose to add those elements in while leaning into beauty and away from realism.

Our other big storytelling device is the light. I decided to set our scene in a dining room with a lot of windows, on a bright, clear, snowy winter day. To achieve that, I made a couple of choices:

  • I wanted a clear mix of hard and soft light so I am using two strobes.
  • The key light is diffused with a large softbox, creating a soft, even light.
  • The second light is a bare-bulb strobe to achieve the hard, almost glaring winter sunlight.
  • Our second strobe is shooting through the Dapple Pro Cucoloris to create long, impactful shadows across the set.

As a result, the image has a blend of soft ambient light with beams of glaring hard light, imitating the reflection of the snow through the trees and windows. The hard light creates highlights that really bring out the fresh, juicy quality of the blood oranges, the shiny richness of the cranberries and pomegranate seeds, and lends visual interest to the glassware.


A Quick Lens Switch for Photographing Food and People (Me!)

Between the overhead hero shot and the handheld macro detail shots (coming up next!) I wanted to make sure we had a human element for our editorial spread. Using people when photographing food can help to personalize your shoot, making it more realistic. If you’re incorporating editorial food photography into your own holiday meals, you will have plenty of available models in your family and friends!

A zoom lens, especially the SIGMA 24-70mm F2.8 DG OS HSM | Art zoom lens that I used here, is a great option for the lifestyle elements of your editorial photo shoot. It is versatile, which is important when you’re working around an active holiday table, and not in a controlled studio space. The agility will come in handy to catch little hands reaching for Christmas cookies in the same breath as capturing Grandma passing the traditional mashed potatoes.

For the demo, the lifestyle element I chose to capture was a process shot of me washing the greens we used for the salad. Since this was a controlled environment, and I was wearing two hats as photographer and model, we set up the camera on a tripod. In our space, we had the zoom set to 70mm to get nice and close to the action without interfering with the light and our set.

With the help of my assistants, I was able to set the focus on my hands held above the bowl. Then, switching to manual focus, we were able to ensure our focus was right where it needed to be, even as I moved in the frame, trying to catch the falling water droplets.

If you don’t have a willing model or the ability to rig up a lifestyle shoot with you as the subject, there are other ways to add the human element that enhances the storytelling without an actual human.

  • Crumbs, or other small elements like extra sprinkles or seasonings.
  • Taking a scoop out of your casserole or a slice out of your cake and styling a serving on a separate plate.
  • Movement in the photo, whether that’s a drizzle of dressing, pouring a glass of wine, or steam rising from the dish.
  • Silverware “in use” like a butter knife with butter on it or a fork on a plate.

Depending on your circumstances you may have more actual people in your images, or subtle hints of the people involved, but either way your whole story is going to be easier to connect with.


Detail photography with a macro lens

Once we were satisfied with the hero shot, it was time to switch it up, and capture the tiny details that the hero shot may not fully emphasize with macro food photography. In editorial terms, these would be supporting images to complete the layout. It’s a chance to direct attention to other parts of the story. In this workshop, that included:

  • The red pear fizzy drink to highlight another recipe
  • Close ups of the salad itself to catch smaller details that the wide shot misses
  • A macro shot of the dressing with some pouring to showcase movement
  • Beauty shots of our fresh ingredients

If you’re a professional photographer, these images make great potential upsells to clients and more shots for your portfolio. For the hobbyist, this is the chance to capture personal details that help flesh out the story. Maybe at your holiday meal you always get out grandma’s dishware, or the napkins were a handmade gift from a favorite aunt. All of these extra touches while photographing the food will help you remember not only the meal, but also the love, connections, and stories that accompany the experience.

For these additional images, I like to use a macro lens, and I usually hand hold my camera. Macro lenses are favorites of mine. I use one at almost every shoot to get in close and capture the pretty details for sharp, crystal clear macro food photography. I love using a shallow depth of field in these shots for maximum effect, and a SIGMA 105mm macro lens, for example, creates a creamy, soft background.

Looking for a macro lens? SIGMA’s got you covered:

Since we already perfected our composition and lighting for the hero shot, I usually don’t have to make too many changes during this stage to capture beautiful images. I like to walk around my set, finding new, exciting perspectives, and shoot as I go. I snap whatever strikes me as beautiful and then review the images in Lightroom every so often to ensure my focus and settings are where I need them to be.

Switching between types of camera lenses was essential for this part of the process. I simply would not have been able to capture the same stunning details with the 40mm lens we used for the hero shot. It’s the range of images we were able to take that captured the totality of the experience, from the big picture to the tiniest most special components of our bountiful winter salad.


A Photojournalistic Editorial Visual Feast

To wrap up the demo, I took screenshots of my favorites and sent them to Mercadees, our graphic designer, to drop them into the layout of the recipe and food photography tips we had already created. It was so nice to see everything put together. It was quite the visual feast!

Through the course of the workshop (check out the video stream here if you missed it), we discussed 7 food photography tips to help achieve an editorial style no matter your photography level or what you’re photographing. You can check out our sister article on Little Rusted Ladle for a full rundown of the principles we discussed.

And, if you’re interested in my bountiful winter salad recipe, you can find it on the blog here.


Show Us Your Food Photography

I hope you enjoyed this brief demo in editorial food photography and are inspired to try out some of the techniques in your own work! You’re going to love what it does for your images. Let us know in the comments if you have other story-enhancing food photography tips.

We’d love to see what you create, so be sure to tag @littlerustedladle and @sigmaphoto on Instagram when you post!

Want to try the editorial template? Download our free canva template and overlay files.


Keep in Touch and Learn More About Food Photography!

Interested in more high-level food photography education? Check out my signature mentorship program, Portfolio To Profit for photographers who want to book more commercial food photography, or my intro course Inspiration to Portfolio if you want to highly improve your skills as a food photographer.

Looking for an experienced visual storyteller to connect with your audience on your next food photography campaign? Find more of my work and book a call with me at jenacarlincreative.com.

I am excited to hear from you! In the meantime, don’t wait for a special occasion, create one!

It’s the Little Things: The Simple Joys of Macro Photography

In today’s image-saturated society, it often feels like every photo there is to take has already been taken. Visit nearly any spot on the map – from the most popular tourist trap to the most remote frontier – and you can rest assured that someone, at some time, has probably framed up the exact same shot.

Of course, there’s nothing wrong with photographing the Eiffel Tower for 100-zillionth time… pictures evoke memories in us that are worth preserving. But sometimes, we photographers feel the need to see and capture things from a new angle. We need to shake up our view of our surroundings. And no technique changes your perspective quite like macro photography!


What IS Macro Photography?

Macro photography, as we know it today, is loosely defined as extremely close-up, highly-detailed images of small subjects. If you’ve seen a photo of an insect with its compound eyes staring straight down the barrel of a lens, antennae and leg hairs on full display, you know what I’m talking about. Technically speaking, “macro” is often defined as “shot at a 1:1 ratio” where the subject is projected on the image sensor or film plane at full life size, but if your final image is super-close and super-detailed, that’s good enough for most of us. In fact, anything closer than a 1:4 ratio is generally considered macro territory.

Flowers, tiny critters, jewelry, water drops, food, a piece of lint from the dryer… almost everything can be photographed very up-close with incredibly striking results. And with the right equipment, some patience and a little creativity, anyone can shoot great macro photos from virtually anywhere… from the Eiffel Tower to the kitchen counter!


Getting Started with Macro

To start shooting macro photos, one truly does need a capable lens. A close focusing distance and a fairly long focal length are both essential components if you really want to magnify your subject! SIGMA manufactures a number of excellent macro lenses, including full-frame prime lenses with 1:1 magnification, as well as versatile APS-C format zooms that offer approximately 1:3 magnification. Some great options include:

SIGMA 105mm F2.8 DG DN Macro | Art (for Sony & L-Mount)

Exclusively for mirrorless cameras, this full-frame lens was designed with optical precision and bokeh quality as the top consideration. And indeed it’s tack sharp, perfect for capturing miniscule details, and it’s a great portrait lens… but it goes beyond that. This 105mm lens features an adjustable aperture ring (which can be de-clicked for video), aperture lock switch, AF/MF switch, customizable AFL button, focus limiter, and a weather-sealed body!

SIGMA 70mm F2.8 DG Macro | Art (for Canon, Nikon, Sony & L-Mount)

This lens features a close focusing distance of just 10.2 inches, and combined with a focal length of 70mm (which makes this a nice portrait lens, too), you can achieve 1:1 reproduction of small subjects at an affordable price with Art-level optics.

SIGMA 105mm F2.8 EX DG OS HSM Macro (for Canon & Nikon)

Released before the Art line came to fruition but with equally spectacular clarity, this lens also features in-lens optical stabilization to help keep your handheld images steady and crisp at this longer focal length. With a classic long portrait focal length and a shallow depth-of-field at F2.8, this is another lens that can do double duty!

SIGMA 17-70mm DC Macro OS HSM | Contemporary (for Canon & Nikon) – DISCONTINUED

This is a great all-purpose APS-C (crop-sensor) lens that gives you enough magnification (reproduction ratio of 1:2.8) to take close-ups of flowers, food and other small objects. If you have a crop-sensor camera and you want a higher-quality alternative to your “kit” lens with macro capability, this is an excellent option.

SIGMA 18-300mm DC MACRO OS HSM | Contemporary (for Canon & Nikon) – DISCONTINUED

Sigma’s all-in-one crop-sensor 18-300mm lens is capable of shooting nearly everything life throws in your direction; landscapes, portraits, sports, wildlife, and yes, extreme close-ups. With a reproduction ratio of 1:3 and a huge focal range, this lens can reveal details in small subjects while offering a longer working distance than most macro tools.

Optional Accessory for the 18-300mm DC Macro OS HSM Contemporary – DISCONTINUED

The above 18-300mm is a great all-in-one lens, but if you want to further extend its macro capability, Sigma offers an exclusive, optional Close-Up Lens (AML72-01) that fits directly to the front of the lens and increases the magnification ratio to 1:2 while maintaining image quality.


Additional Options:

Extension tubes – These empty cylinders essentially place the lens further away from the image sensor, resulting in a closer focusing distance. Extension tubes are relatively affordable and usually give you good results, but they are mechanical only, meaning you won’t have electronic control over your lens. Great for old manual lenses, not so great for modern optics.

Close-up lenses / magnifiers – These attach to the front of your lens just like regular filters, and increase the size of the image, basically like putting a magnifying glass in front of your lens. While some are optically excellent and can produce surprisingly sharp results (like the above SIGMA AML72-01), many cheaper options are made to low standards and result in decrease image quality.


What About the Camera?

When it comes to macro photography, any interchangeable-lens camera will do, but megapixel count is important if you expect to crop your images. A 50-megapixel camera will yield much more detailed crops than a 24-megapixel model, and when getting up close is the entire point, “zooming in” becomes much easier when your images have more pixels to work with. That being said, it’s always better to get the most out of the lens you’re using – shooting at the minimum focus distance, for example – and a standard-resolution camera will be just fine in most situations.

One bit of technical info to remember… crop-sensor cameras have a further “equivalent” focal length than full-frame models, meaning your practical focal length is longer than the lens would indicate. For example, a 70mm lens becomes a 105mm lens on most APS-C cameras. Macro shooters often prefer APS-C format for just this reason.

And for those with point-and-shoot cameras with that little flower icon on the back of the camera, don’t expect miracles, but the “macro mode” of compact cameras does give you some flexibility for close-up shooting. If you’re just dabbling in the world of macro photography and you aren’t ready to spring for a dedicated lens just yet – or if your kids want to give macro shooting a try – bust out those old pocket cameras and give it a whirl!


Macro Shooting Techniques & Tips

Smaller Aperture – In many situations, shooting at a large aperture (F1.8, F2.8, etc.) is preferable, as a bigger aperture means more light. More light means faster shutter speeds, leading to sharper photos. And large apertures also give you nice, shallow depth-of-field, giving you nice background blur when you want to isolate your subject. But because the focusing distance on a macro lens is so close, shooting at a wide-open aperture will give you a razor-thin depth-of-field. In other words, almost nothing will be in focus, and all that wonderful detail will be lost. When shooting macro subjects, resist the urge to only shoot wide open and try some smaller apertures (F11, F16) to bring more of your tiny subject into focus.

Tripod – Of course, when you stop down your aperture, you cut down on light, which means handholding your camera might not be feasible. Using a tripod will steady your camera for those longer exposures, and will help you keep your subject in-frame so you can optimize your focus and settings instead of constantly recomposing. Just remember to turn off optical image stabilization, which can actually introduce blur when there isn’t any movement to compensate for.

Self-Timer or Remote Trigger – If you’re using a tripod, you might as well go all the way and use the self-timer function or a remote shutter release to eliminate ALL movement from your camera and lens. Remember, extreme close-ups and long focal lengths will greatly magnify even the slightest motion, so if you can avoid touching your camera altogether, your images will be even sharper.

Flash – Another way to get sharp shots while using smaller apertures is to use a flash. A flash will provide a powerful burst of light so you can use fast shutter speeds, leading to sharper photos. You don’t necessarily need a special, expensive macro flash – a regular flash will do – but keep in mind that just like portraits, bouncing the light off a larger surface or using a wireless trigger system to place it away from the camera will probably give you the best results.

Manual Focus – Despite pinpoint AF methods and the best technology, autofocus doesn’t always nail it at such precise levels. Switching to manual focus in these instances can give you a greater degree of control and consistency, and thanks to electronic viewfinders and live-view rear screens, you can zoom in and utilize “focus peaking” to fine tune your focus even further.

Exposure Compensation – One of the sneaky little side effects of macro photography is something known as the “bellows effect” that essentially darkens your exposure as magnification increases. This affects all macro lenses, so take note of your exposure as you creep ever closer to your subjects. You may need to bump up your ISO or slow down your shutter speed to get a proper exposure, even at maximum aperture, and which method you choose can determine if you need a tripod or just an extra-steady hand. Your SIGMA macro lens should include a chart indicating how much exposure compensation you will need to apply depending on the reproduction ratio, so be sure to take a look at the instruction manual.


Get Out There!

You have the gear. You have the know-how. Now it’s time to get out there and start shooting! Of course, when it comes to macro, you don’t have to go far… and that’s the beauty of this genre. Finding compelling subjects to photograph is as easy as browsing around your home, your office, or your back yard.

And while all the typical photographic skills certainly come into play – lighting, exposure, composition, etc. – remember that macro photography is all about finding and expressing a unique perspective… taking a completely different view on something that might seem insignificant from a human-sized first glance. And once you see how the world can appear from a smaller set of eyes – the eight eyes of a friendly spider, perhaps – you’ll add something new and special to your life experience that you may have never discovered without a camera, a macro lens, and a lazy Sunday morning.

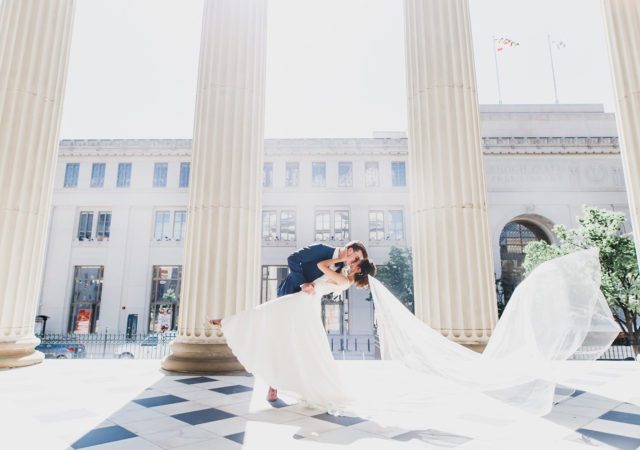
Making the Most of Elopement and Micro Wedding Photo Sessions

On January 1, 2020, we all made resolutions and decided that this was going to be “our year”. COVID-19 came in and sent our worlds spinning! With every country and state that shut down, a little piece of our hearts broke a little more. As much as we’d love to believe things will be “back to normal” soon, this is highly unlikely. No matter how much we love large wedding parties at luxury destinations, as business owners, this is our time to pivot.

Our clients are becoming discouraged, but it is our job to instill hope into their crushed wedding dreams. Clients may come to you with a new, scaled-back plan to only cover the ceremony and a few portraits after, and that’s okay! While I enjoy a grandiose, extravagant wedding with 500 guests as much as the next person, there is a level of intimacy that you build and foster with your couples when it is just you, the couple and a handful (if that!) of others in attendance.

There are so many different ways that “micro weddings” and elopements can be made special for the couple, but I would have to say that my favorite part is how much time they spend together on the actual day — which translates to more photos of them than you’d normally get at a larger wedding. At a typical wedding, the couple rarely sees each other at all before the ceremony unless they’re doing a “first look” photo, and even then, the first look tends to be closer to ceremony time. With elopements, since there is no need for a venue with a large capacity potential, the couple tends to spend the majority of the day together. Some spend their pre-ceremony time helping each other get dressed, talking about the future and video chatting with friends and family. It is our job and privilege to guide them into seeing how they can get so much more out of their day. Let’s dig into how we make this happen!

Wedding Day Details

Regardless of a date change, venue change, or how many guests they have, details still matter! They still invested in their details to make the wedding of their dreams come true! Rings will still be exchanged, floral arrangements crafted, and a cute new invitation suite can be designed for this smaller occasion!

The same detail shots that were originally planned should still be captured, and for this, my go-to lens is the 105mm F2.8 EX DG OS HSM Macro. When I first started, I was intimidated by macros because when I thought macro, I thought photos of a tiny bee on a flower. I didn’t want to buy a lens that I didn’t think was versatile, but this Sigma 105mm can do it ALL! This lens has been my #1 for details on a wedding day, but I also bring this lens out for portraits and ceremony too — we’ll get more into that later!

Using a macro lens (specifically the Sigma 105mm) gives you the ability to capture details both large and small with precision and purpose without sacrificing the clarity of whatever you’re photographing. Creating a flat lay for your couple’s details is an easy way to ensure that nothing is forgotten. Gather all the details of the day that are important to your couple — think shoes, jewelry, invitations or announcements, heirlooms and their ONBB (old, new, borrowed and blue) items — and utilize your surroundings to style the details in a way that ties into the full story of the day. Once you have your couple’s wedding items styled in your flat lay, you can capture them as a collective with a wider focal length (think 35mm F1.4 Art) and grab shots of each individual item with ease using the 105mm. This lens gets you close enough to the details to capture each individual stitch without worrying about your breath knocking something down as you exhale! Never hold your breath during details again!

Getting Ready Before Tying the Knot

So what if your clients are getting ready in their home instead of a 5-star hotel? They are still taking all the steps they would have originally! This hour counts! Take close up shots of things like getting zipped and buttoned into their wedding day attire, the spraying of perfume/cologne, and those final finishing touches. These tiny, important details of the day are almost always shot with my 35mm F1.4 DG HSM Art or 85mm F1.4 DG HSM Art. Both give me the ability to create a connection and intimacy in the images that can’t be matched.

One of the most popular draws to the 85mm Art is the capability to open your aperture up to that creamy F1.4! This allows you to isolate your subject in a way that leaves the background as soft and dreamy as clouds! I prefer shooting with prime lenses over zooms because I like the idea of using a lens for the exact focal range that it was built for. That gives me an even higher level of confidence when I am shooting because I don’t have to concern myself with changing the focal length, and it allows for more creativity. When using a zoom lens, it’s easy to let creativity fall by the wayside because with the flick of my wrist I can be closer or farther away. Using a prime, I am forced to physically move my body to be where I need to be to get the shot I’ve envisioned for that specific moment.

Wedding Gift / Letter Exchanges

It’s important to remind couples of the reason they are doing all of this. At the end of the day, they will have these photographs and each other. Encourage them to exchange gifts and/or write letters to each other. These are special intimate moments that can be created for free! Find somewhere intimate and beautiful to capture the emotions of this exchange. The SIGMA 50mm F1.4 DG HSM Art is perfect for this. You are far enough to give them space as they open them and just close enough to capture the emotions of the exchange.

First Look with Parents

Moments with parents can be captured in a small “getting ready” room, or you can take them to the same location you plan to do the couple’s portraits to create cohesion in the backgrounds in their wedding album. This intimate moment with the people they’ve spent all of their life with right before they start the rest of their lives is a gift that their parents will cherish forever. It’s a moment they will never forget and a reminder that they still hold a special place in their child’s life. Since my SIGMA 35mm F1.4 DG HSM Art is one of my most versatile lenses, this would be my go-to for these moments.

First Look or First Touch

A lot of couples have plans to do a first look and then think it’s unnecessary once they are changing it to a smaller event. This is still 100% necessary!! Express to them how important it is that when they are fully dressed as a bride or groom for the first time, those final touches have been completed, and they’re not completely dripping with nervous sweat walking down the aisle is the perfect time to devote 30 full minutes to taking portraits. The moment they turn around to see their fiancé on their wedding day for the first time can be captured at a distance by the SIGMA 135mm F1.8 DG HSM Art, 105mm F1.4 DG HSM Art and 85mm F1.4 DG HSM Art.

No matter how comfortable your clients are in front of the camera, these moments are ones that you don’t want to interfere with by being too far in their space. Using an 85mm Art, 105mm (Art or Macro) or 135mm Art gives you the ability to stand far enough back that they feel no pressure to look a certain way for the camera when they shouldn’t have to think about that at all. These lenses offer privacy for your couples, but the images come out crystal clear and they will be left wondering how you got those images standing so far away! These moments are going to be what’s on their walls and in their wedding albums forever. Remind them of the importance.

After you’ve captured these significant pre-ceremony photos, you can proceed with the rest of the day as usual. Make sure that you are paying special attention to each guest in attendance because with the limited guest count, you can guarantee that these are their favorite people in the world! Showing your clients that you can still celebrate them and capture their day authentically and beautifully even with a limited guest list will only show them that they made the right decision in choosing you! During times like these, where planning a wedding feels like a gamble at every turn, you have an incredible opportunity to put your couple at ease!

Shoot (and Practice) with Different Focal Lengths

Changing up your lenses throughout the day versus shooting with just one or two will always leave more room for creativity. Earlier I mentioned how shooting with prime lenses forces me to be creative because I have to physically move, and while that’s true, it also makes for easy work in expanding my portfolio. Before the day of the wedding, practice and play around with your lenses at home. Photograph your dog in the backyard in all different lighting situations with all of your different lenses — you can even rent a lens that you don’t already own to test it out before you buy! This will give you a full gallery of images that you can study to learn the capabilities of each lens and their different advantages.

Comb through that gallery and take notes on how the background looks on an 85mm F1.4 versus a 35mm F1.4. Pay attention to the detail that’s captured in the blades of grass and play around with flat lays at home so that when the wedding day comes, you’re prepared for any situation that arises. Use every lens you have to photograph the same flat lay (try to include as many small details as possible) and compare those images and choose the lens that best fits your vision for that image. You’ll be able to see which lens, at which aperture, delivers the look that you want, and when the wedding day arrives, you will navigate through the entire timeline with ease, no matter how long or short the day is!

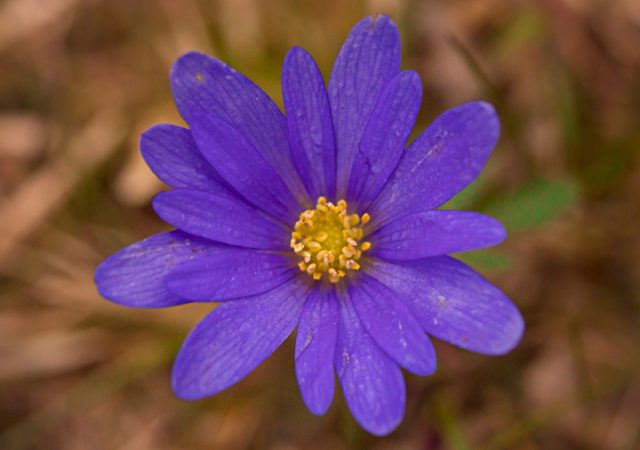
Portrait Girl Gone Macro

What’s a portrait artist to do during a pandemic in the midst of social distancing, after having exhausted all possible subjects (namely, my children and our dog)?

Luckily, my friends at Sigma sent me a 105mm F2.8 EX DG OS HSM Macro lens (Canon EF mount) to experiment with.

Getting ready to explore the yard with my faithful puppy!

This promoted me to stop, take a breath, and begin to take notice of all the tiny miracles around me. It was time to come out of my comfort zone and try something completely new.

I focused on nature. And that’s where this portrait girl fell in love with macro photography.

105mm F2.8 EX DG OS HSM Macro, Canon EOS 5D Mark IV, 1/1600s, F/5, ISO 640

Off I went to explore springtime in Michigan in my neighborhood. Surrounded by the emergence of buds on the trees and insects coming out of hibernation, I felt inspiration everywhere. I felt like a detective. I vowed to leave no stone unturned.

105mm F2.8 EX DG OS HSM Macro, Canon EOS 5D Mark IV, 1/800s, F/9, ISO 800

Spring is a time of rejuvenation. Spring is the season of hope and new beginnings, as the earth seems to come alive again. Nature’s consistency offered me a much needed sense of security during this insecure time we are living through.

105mm F2.8 EX DG OS HSM Macro, Canon EOS 5D Mark IV, 1/2500s, F/5, ISO 640

Because of my environmental portrait work, I know that spending time among nature reduces my stress. It makes me feel better emotionally, reducing my heart rate, blood pressure and production of stress hormones. This is just the medicine I needed.

105mm F2.8 EX DG OS HSM Macro, Canon EOS 5D Mark IV, 1/500s, F/11, ISO 2000

Shooting macro forces me to think of camera settings like never before. Focus is much more precise, somewhat tricky, and takes a lot of practice. Even just a slight wind is a definite hindrance.

Images from my first foray into macro were created at f/11 – f/13, a high ISO to compensate for a very high shutter speed. In portraiture, I’m used to shooting with a wide open aperture, so this took some mental adjusting!

105mm F2.8 EX DG OS HSM Macro, Canon EOS 5D Mark IV, 1/500s, F/8, ISO 800

Is there room for improvement in my images? Most definitely. The point is that I tried something brand new, and it’s keeping me feeling creative and inspired.

On what feels like the 74,532nd day of sheltering in place, like me, you will likely find yourself desperate to pick up your camera and create. In this inhuman state of shaggy hair, rapidly graying roots, too many trips to the refrigerator, an overabundance of Zoom meetings, every-day-is-Groundhog-Day mindset, you may even decide to do something radically different. Don’t be afraid to take that leap!

105mm F2.8 EX DG OS HSM Macro, Canon EOS 5D Mark IV, 1/1600s, F3.5, ISO 500
105mm F2.8 EX DG OS HSM Macro, Canon EOS 5D Mark IV, 1/2000s, F3.5, ISO 500

A special thank you to Sigma and to Heather Larkin for her critique and guidance.

Exit mobile version