The SIGMA fp camera is the world’s smallest cinema camera that provides creators, videographers and film professionals modularity and many different choices to enable content creation. SIGMA built the camera to allow creators to have choices when using the device. Choices for different situations and different requirements such as shooting BRAW with the SIGMA fp.
SIGMA fp RAW Capabilities
If you need small, lightweight file types, you can record directly to a SD card for quick turnaround times, while if you need all the power of RAW you can record 12 bit CinemaDNG files to an external SSD drive to give you the most flexibility in post processing. The wonderful thing about the modularity of the platform is that SIGMA, with firmware version 2.0, also allows creators the opportunity to record out via the HDMI port into a third party recorder to get RAW (Compressed or Uncompressed) out.
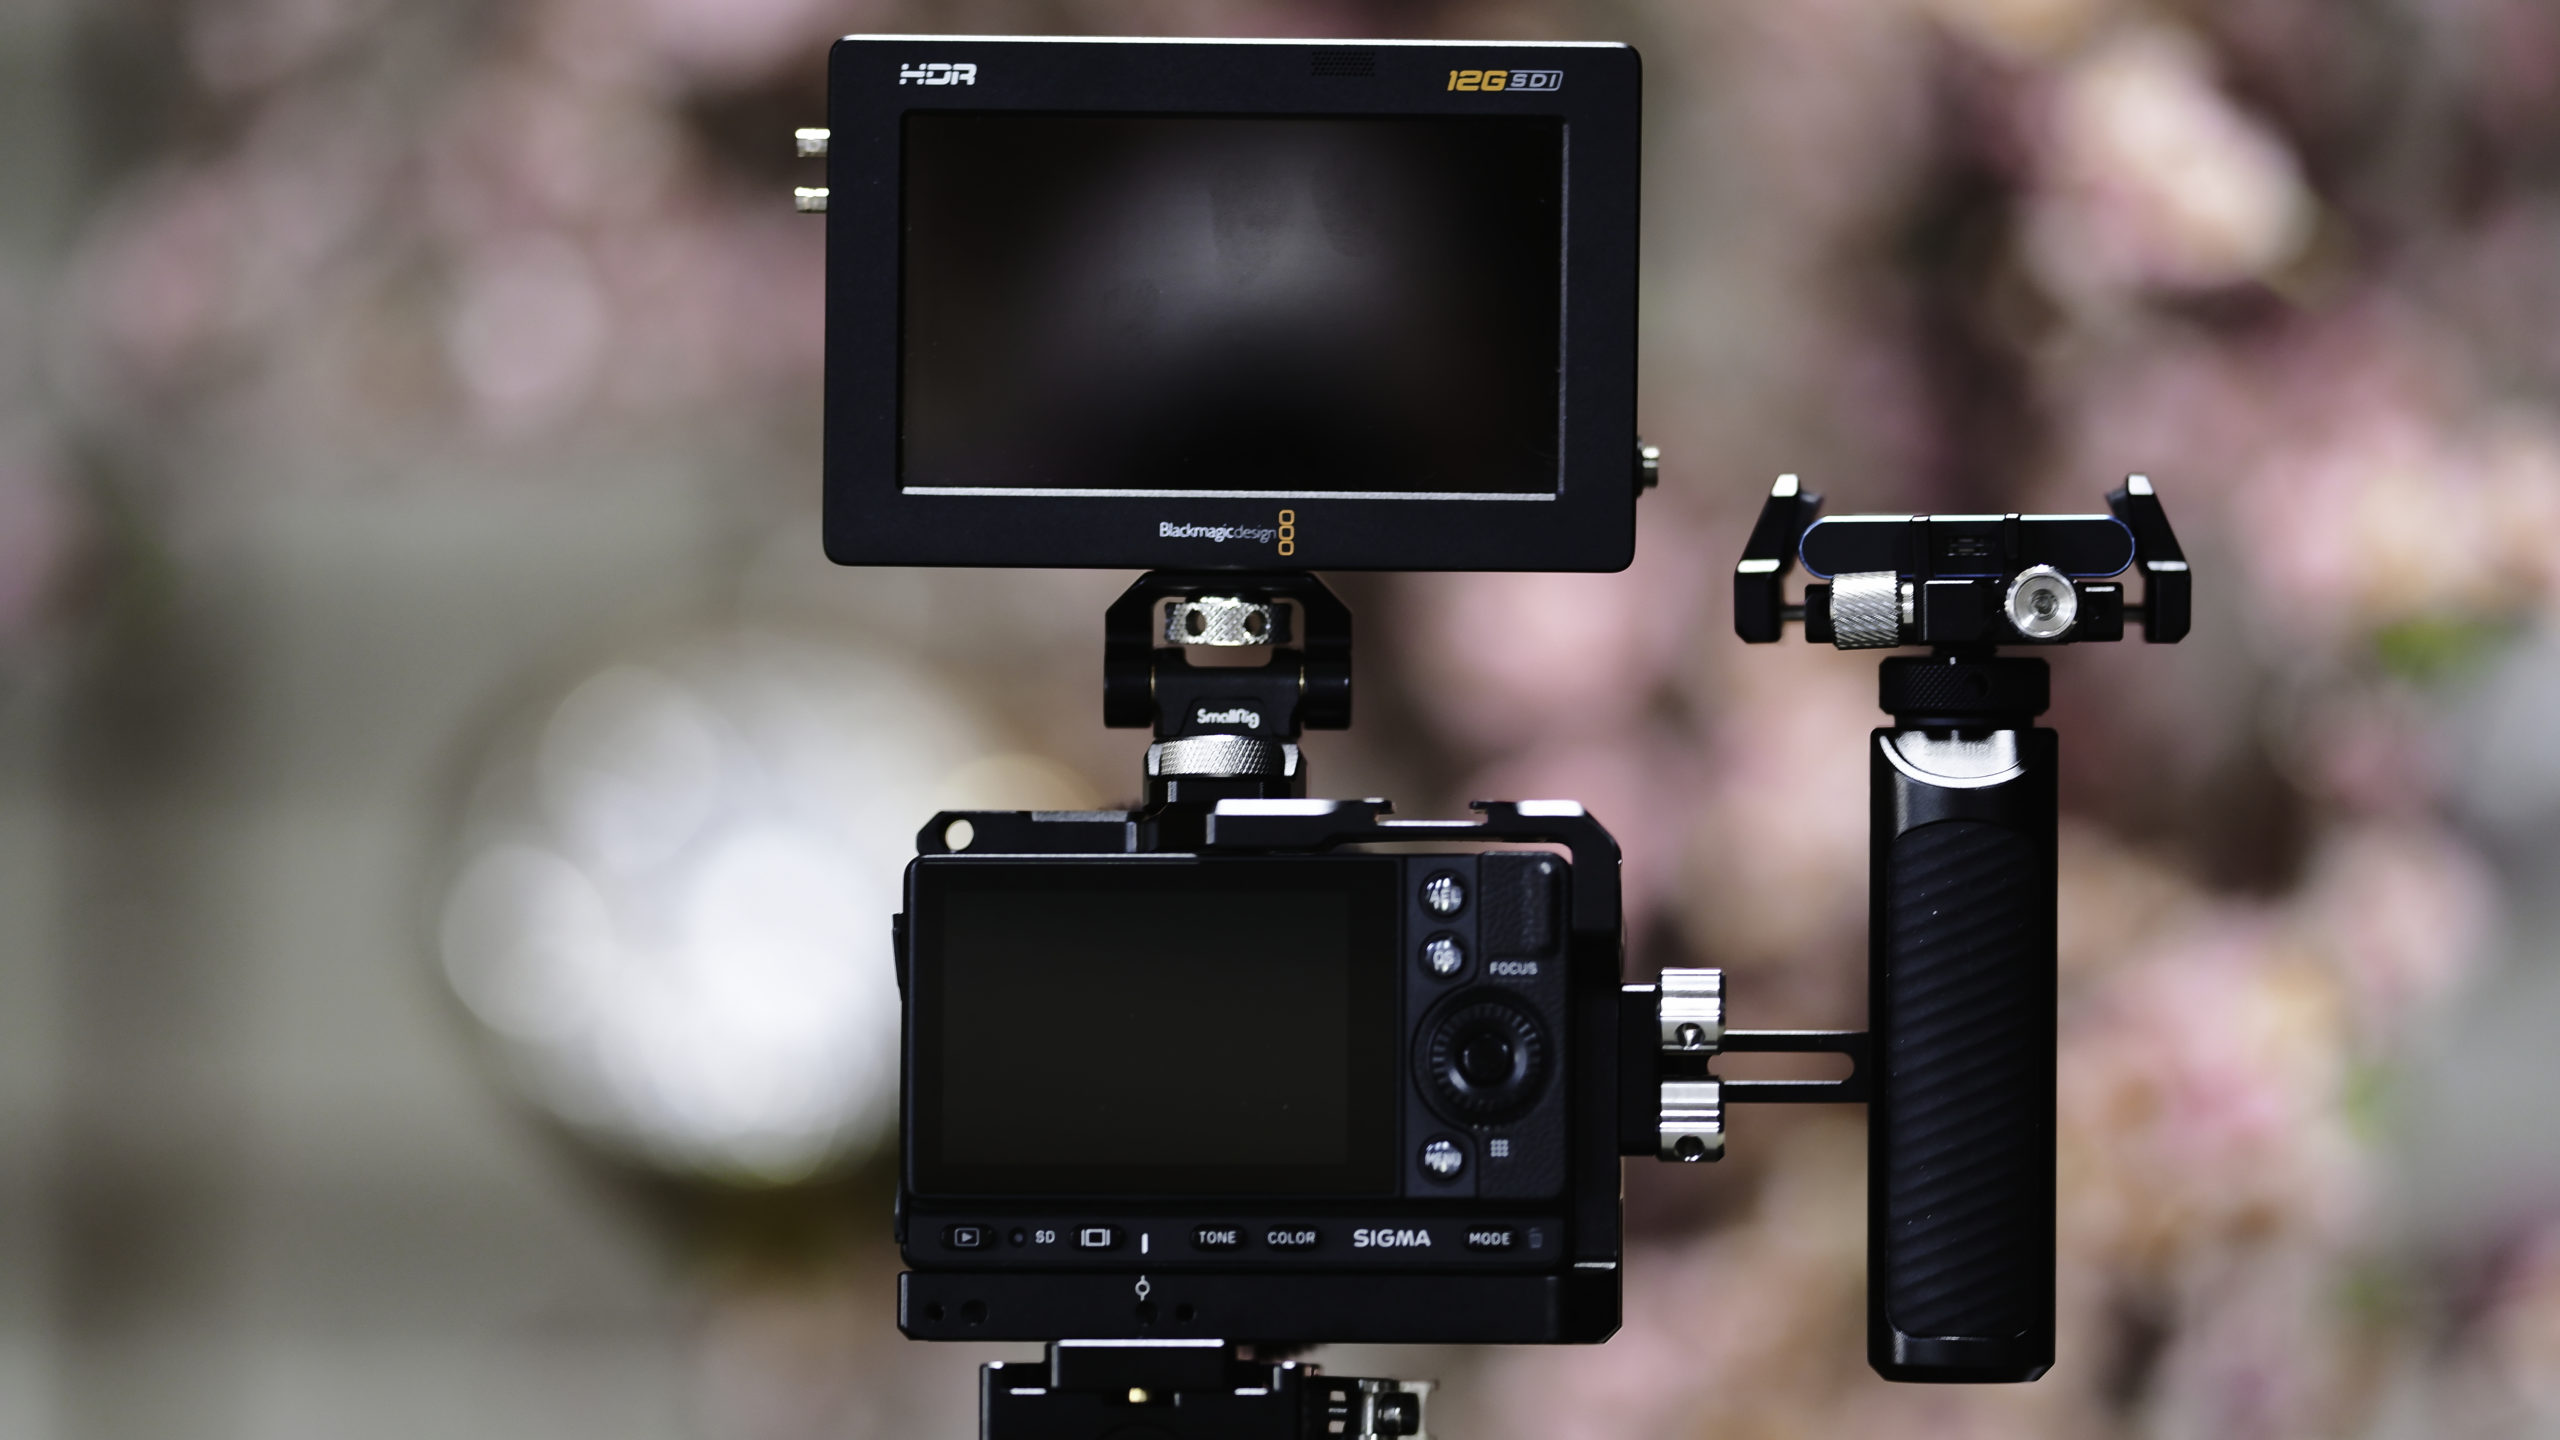
Atomos provides their version of RAW, ProRes Raw out to a Atomos recorder device and BlackMagic Design allows their RAW, BRAW out to their recorder, The BlackMagic Design Video Assist 12G SDI/HDMI HDR recording monitor that is what is commonly called in the industry as a “high bright” monitor. The Video Assist is an astonishing 2500 NITS to provide easy viewing in the harshest of bright sunlight. The Assist comes in both 5″ and 7″ sizes and both come with HDMI ports and either full-size 12G SDI or smaller BNC connectors on the smaller 5″ model. This article will show you how to use the BlackMagic Product with your SIGMA fp.
SIGMA fp and BRAW
The fp has the ability to output recording to the BM Video Assist via the micro HDMI port on the side of the camera. Once you’re plugged into the Video Assist you’ll need to take advantage of the USB-C port on the Assist and cable up your external SSD to its USB Port. Take note the Assist’s USB port is located on the bottom of the device, but never fear, BlackMagic has provided users with a no less than six ¼” mounting points on the recorder. Depending on your monitor mounting, you may have to simply mount the monitor “upside down” to get to that USB-C port.
Select Output, Resolution, and Frame Rate
Power up your fp and the Video Assist. Once you are all hooked up via the fp and the SSD drive you will need to go into the fp menu system and make sure your recording is set up correctly. Luckily, the fp menus are easy to navigate. Just menu over to the yellow “System” section and select the fourth yellow tab. Select HDMI Output to “Recorded Image Output” and select the “Output Format to “RAW”. Here, directly under the Output Format you will find Resolution and Frame Rates. Just select the desired settings. Don’t forget once you menu back to the original system fourth tab you will find the USB Mode selection, just make sure you have selected Mass Storage.


Now the fun starts with all your choices you have with the fp on the Video Assist.
Blackmagic Video Assist Settings
If you’re familiar with BlackMagic’s newer cameras such as the Pocket 4K, 6K and the Ursa Mini Pro line you’ll be right at home with the settings for the Video Assist. A touch screen gets you around quickly and the menu system is easy to navigate. While I won’t go through every menu option such as audio and LUTS, be rest assured your options are numerous on the device.
The main screen of the Video Assist shows you various information from top left to right which includes, Screen settings, CODEC, FORMAT, Timecode, SOURCE, Battery Life (two batteries). The upper right icon will always get you to the menu system of the recorder.

Here you will notice there are various tabs for settings located at the top. RECORD, MONITOR, AUDIO, SETUP and LUTS. If you click on RECORD you will be presented with that section. The section includes Input type, Codecs and Codec Qualities. Please also note if there are any sub menus simply look down towards the bottom of the screen and you will see numerous “dots”. The dot that is active will be blue while other screen available but will be white when not active.

Additionally, towards the center of the screen on the left and right edges you will find back and forward arrows to guide you around the device. In the Codec portion of the screen you will notice you have numerous options for Codecs. Such as, Blackmagic RAW, ProRes and DNxHR (Avid). For this discussion let’s stick to Blackmagic Raw (BRAW). If you notice under the CODEC section towards the bottom of the screen you will see CODEC Quality. Please refer to BlackMagic’s documentation for all the explanations of Constant Quality and Constant Bitrate compared to each other. Depending on your requirements, card size and post production workflow you have many options to decide upon. The lower the compression ratio the higher quality you get but the more card space you use.
In the next section you find from the main menu is the MONITOR section. Here you will find two menus. First provides the user with a bevy or toggle off or one “switches”. You may choose Clean Feed, Display 3D Lut, Zebra, Focus Assist, Frame Guides, Grid, False Color and Blue Only on that first screen. The second screen dives deeper into Focus Assist Type, Focus Assist Color choices, LCD Rotation and Anamorphic DeSqueeze.


You can record directly from the Video Assist by going back to the main menu and touch the red record button. It’s directly left of the play arrow button will trigger recording. To stop simply touch the button to the right of the play button.
BRAW into DaVinci Resolve
Once you’ve recorded your shots/files, bringing the BRAW files into DaVinci Resolve results in a seamless workflow for editing and color. Assuming you are familiar with Resolve and know how to import files and set up a new project. Once you’ve set up your project, and started the edit process proceed to the color tab in Resolve.

The camera raw data can be found in the lower left corner of Resolve in the Color section. You will notice you have many drop down menus. To get to the full power of the RAW files choose “Clip” in the section of Decode Using. With this, you have the ability to change White Balance, Color Space and Gamma as well as Highlight Recovery. Additionally to the right, color temp fine control, tint and Exposure are available within the RAW file. Please note that ISO changes within the RAW files are not available but you do have exposure control. When I work with the fp BRAW files I always choose the Gamma setting of BlackMagic Film. It’s a good flat baseline to work with when starting to work with the files.
“OFF” Mode vs Color
In the video below, see the difference between the straight out of camera file with color set to “OFF”. Which give a flat as possible file for grading, and the colored file in Resolve.

For example sake I simply brought in the BRAW file, added a LUT and then adjusted the contrast, saturation and white balance as a baseline. From there I can decide upon what color to “push” or extract, or what areas need exposure adjustments etc. I rarely use all the power of Resolve myself for things such as re-lighting a scene. Typically I use a professional colorist instead of myself. It’s better to leave that to the professionals and stay in my wheelhouse of Cinematography.
The designers of the SIGMA fp have made a truly modular modern cinema camera in a small package. As creators and professionals they have given use many choices for our workflow methods. Now, go out and make some great content with the world’s smallest cinema camera!
Click the Links Below to Read More:

