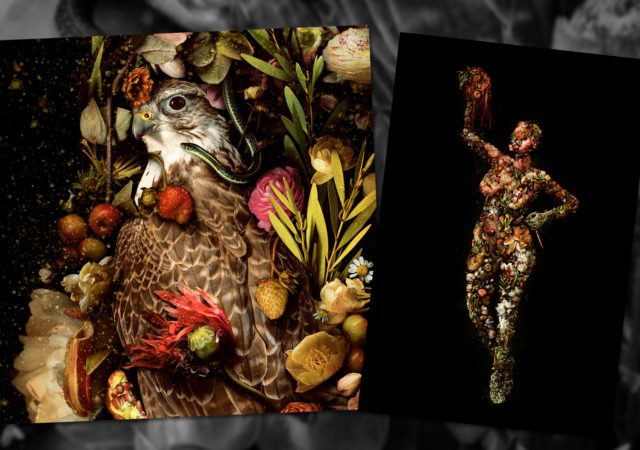
Creating Exquisite Digital Collages with the SIGMA 70mm F2.8 DG Macro Art Lens

My name is Meggan Joy, and I live and work in Seattle as a professional artist, primarily making digital collages with every piece of flora, fungi, and fauna I can get in front of my camera.

The medium of digital collage is relatively new as far as the history of art is concerned. It mixes the analog photography and collage techniques we know and love with its digital successors’ approach and unrestricted means. Same idea, just digital. For me, that means I get to spend all day knee-deep in macro photography, focusing (literally) on the tiny details we can often overlook, intending to bring all those small photographs together to make something big.


How a digital collage begins

An idea can sometimes start three or four years before completion; a quick sketch of the pose, a few words describing the context for a title or a hint of a concept that I believe lines up with the medium.

That’s all it takes to get me excited; from there, I dive into my research to see what I can find. Is there a famous historical portrait people associate with this theme? Is there an old wives’ tale about a particular herb that could be tucked into the piece? Is there a seed-dispersal mechanism that is thematic to add?

Ultimately, my art practice is rooted in cultivation, beginning with the new growing season. Each year, I select plants with particular characteristics, from the fruit they produce to the shape of their flowers to their qualities to attract certain insects and birds, etc. All this is done with my artwork in mind as I tend to my garden. (I’m lucky enough to steward a community garden plot here in Seattle.) For any subjects I can’t cultivate in my garden, I either take a hike with my portable studio on my back or purchase from my local co-op flower market. Then, I mash my daydreams and realistic goals together, and photograph all these beautiful tiny things in glorious detail.


The photographic process with the SIGMA 70mm F2.8 DG Macro | Art

I try to photograph every aspect of the life cycle using my specialized studio setup. This primarily consists of a LED desk lamp, a spray bottle, repurposed florists and baking tools, and of course, my ride-or-die SIGMA 70mm F2.8 DG Macro | Art lens. Think of each image as a single brushstroke in a painting, but beyond just giving color and form, it provides context as well, and all of that has to be meticulously planned before I can start on a piece.

To make these large-scale collages, I first think small. My purpose in the studio is to get as much data as possible so that when I head into Photoshop, I can think unrestrictedly big. When photographing the considerable amount of material I need to do my work, I want all the details caught, and these images must be consistent.

I need my shadows compatible with each other, the focal length to be roughly the same, and I need the image quality to be perfect, meaning a tiny alpine strawberry in the center of my frame needs to look crisp, but also the hairy leaves branching off to the side of my frame as well. And I want that color to be exactly as it is, as I may use strawberries photographed over many seasons in a single piece.

Using this same setup repeatedly means that each image I take will blend seamlessly with the next. After years of doing this, I know the kind of focus falloff I’m looking for, so I don’t mind changing my settings as I handhold (a lightweight lens like the 70mm F2.8 DG Macro | Art is crucial for this), so I can physically move back and forward for unique shapes outside of the norm – that said, I generally land on 1/100s, F10, ISO 600.

I’m always trying to get 90%-95% in focus, getting as close to that near and far focus limit as I can and allowing no more than about 10% fall off, as a bit of DOF helps create the illusion of cohesive depth in the collage. Sometimes, I even orchestrate some calculated movement blur that adds to the chaos I want my figures to have, as a living garden or a living person is never truly still.

If something is larger, I’ll lower my f-stop and move back; if something is waxy and more reflective, I’ll dim my desk lamp or tape some glassine around it and bump up my settings a touch; if it’s an insect that can move fast – I change just about everything including my shutter speed and say a prayer for the patience I will surely need. (I once photographed butterflies for a piece for the Pacific Science Center and have sworn off living butterflies ever since.)

Once photographed, I catalog these images using my personal methodology. Each specimen’s color, texture, shape, and qualities are noted and searchable within the metadata, along with any historical meaning, folklore, or scientific references that I want to include in my final collages.

Incorporating these elements, however inconspicuous they may seem on the surface, is important to infuse each final piece with a deeper meaning. For example, I’m currently working on a piece for my next solo show, Fever Dream at J. Rinehart Gallery in 2024. This piece requires nourishing commodities representing the final harvest’s abundance and weight.

So I headed to my florist co-op and picked up some gourds, keeping my color pallet of pastel pinks, burgundy, and greens in mind and looking for unique shapes and various sizes. While photographing my haul in my simple but mighty desktop studio, I invited a few snail friends to munch on the squashes to further illustrate the narratives of overabundance.


My favorite macro photography techniques

While the photography process might sound simple, creating images that can be used to build intricate collages requires some special techniques that I have developed over time.

Creating dew drops for highlights

For example, I frequently mist each specimen so the “dew drops” create a scattering of glittering highlights across each subject. My SIGMA 70mm F2.8 DG Macro | Art lens captures the details of that specular highlight beautifully, adding texture and detail to the final pieces. However, it is also helpful in post-production. The angle of light can be referenced to align the light source of the many other items I photographed while I’m zoomed 600-800% while post-processing. (Zooming in and out too much slows the process considerably.) So even though they have been photographed at different times (sometimes years apart), they still will look fresh and alive next to each other, with the analogous light source harmonizing them.

Rotate subjects to get the most out of your materials

I have to get as many images from one piece of material as possible because otherwise, it’s just too costly of a process, both time and financially. However, I also need the images to look unique, or the illusion disappears. That is where my handy little Lazy Susan comes in, wrapped in gaffer tape and a number on each corner. When I pop that flower on my tabletop, I rotate and photograph it four times to get every last bit of use. With this technique and a bunch of 24 off-season garden roses (which is costly), I would end up with at least 96 unique images.

Examine the beauty in damaged, wilted, and dried plant life

For a long time, I only photographed the vibrant, unbruised florals that could be just as likely in a wedding bouquet as my art; and I was becoming bored. I would browse my catalog and feel like it was missing something that I could feel was in my garden but not the final pieces.

One day it clicked; everything I had was too perfect; you couldn’t see how beautiful it was without seeing the in-between stages or the scaffolding holding the flower. Old botany illustrations are attractive not because they aren’t flawless but because the whole is examined.

So after I finish photographing whatever is in my studio that day, I start slicing into it, tearing at it, even offering a bite to my dogs – looking for a view of the internal structures that could add storytelling to a piece. I also put some of the blooms aside, waiting another 3-5 days until they start looking past their prime or go to seed.

After all, a branch of fresh pomegranates is beautiful and elegant, but a sliced open pomegranate, with seeds tumbling is of an entirely different significance. More so, an aged pomegranate so past its prime that its dehydrated frame is cracking; that’s the final moment of resilience before rest. Finding a balance between what feels right to the piece and what is also interesting to look at is becoming an art in and of itself, so I always try to step back from what I have and see how I can push it. I’m attempting to document the concepts and the physical beauty that make the finished artwork richer.


Why shoot with a macro lens?

When I was little, my family had to have a tree removed from the front yard. Which meant I had to stay in the back yard. I hated being told where I could and couldn’t go, especially if something cool like a tree falling is happening, and I was livid (some things never change!). In my temper tantrum, I face planted into the ground, and when I opened my eyes, I was face-to-face with a batch of blooming clover, buzzing with bees. If you have never looked at it up close, clover is a cluster of tiny little orchid-shaped florets; the more I looked, the more I saw. I spent the rest of the afternoon going through the grass and finding more things to examine. I don’t remember the tree finally coming down, but I won’t ever forget that clover.

Many decades later, I still like to get close. And a 70mm macro lens is close enough to the human eye to feel familiar but just a bit beyond that. It makes me feel like I did when I was a kid. With this lens, you’re taking in more than what you can see with your eye, but it doesn’t feel like a microscope where you lose all sense of self. The SIGMA 70mm F2.8 DG Macro | Art delivers the sweet spot I’m looking for, and it’s like visiting a memory of when I realized the world wasn’t just big; it was that I was big to parts of my world.


Putting it all together

This final phase involves layering each element together until my version of a “ghost” emerges. My immortal figures are made of these once-living things, held in time eternally – due to the mechanics of photography and a bit of Photoshop magic.

I have this broken down into a system I follow, a checklist I complete before moving on to the next stage. I won’t bore you with every step, but roughly, it starts with an outline of whatever shape I’m going for, usually with notes on where to emphasize shadow and which way the light should be coming from.

That “map” layer gets turned on and off as I work. I fill it as a puzzle, keeping shapes and movement in mind. I add as I go, keeping my groups organized by location (i.e., left hand) or by material (i.e., daisies). Once I am happy with the final layering, I systematically check and edit the entire collage with the help of a grid overlay, square by square, zoomed in as much as 800%. That way, I know that no matter how close you, the viewer, get to the physical printed piece, you won’t find any peculiar digital fragments that can pop up when thousands of images are layered together.

Once she’s done, printing is my last big job. And, of course, I’m picky about it. I have two printing options right now; smaller work gets printed on my favorite paper, Moab Juniper Baryta Rag 305 – or a similar Hahnemühle paper, but I like the tooth of the Moab a bit better; it’s just always sold out locally. These days, my work is typically printed by Sandy King of Photographic Center Northwest, who does an amazing job.

For larger works, I work with another local printing service named Bumblejax. They handle the huge prints and mount them to Dibond and Acrylic. They are a great team, and every piece they made for me exceeded my expectations.

Tedious as it all is, I love this. The longest days of my summer are spent pulling weeds in the morning, chatting with farmers and my fellow gardeners at lunch, harvesting blooms in the late afternoon, and photographing into the evening. Better yet, as my mind shifts from collecting to utilizing, I spend my winters curled up with a blanket, a dog, and Photoshop. It is the best of both worlds.

But the best part can be summed up with one interaction I will never take for granted. A few years ago, a woman bought some of my art after what she described as “a rough few years.” She wanted to celebrate her new beginning by having one of my ghosts, Armistice, watch over her as she navigates this new chapter. She later told me she had another piece, An Attempt Was Made, as her phone background for the last year or so. An Attempt Was Made refers to saving yourself, even when difficult. Armistice depicts choosing even a tenuous peace over war. I couldn’t have planned two better pieces for her at that moment.

I love that my images reach the right people when they may need them. When someone emails you and says, “I’m doing better in my life and want to celebrate with your work,” they are saying more than they simply like it; they are saying that they truly understand it.


Tips for the ambitious artist in you!

It took years to inform and create the process that serves as the foundation of the art I want to make. And through a lot of trial and error, I built this art practice that suits me so well that only I could do it.

I hope that you have found the balance between method and process for yourself. And if you haven’t yet, here is my unofficial guide – one being the easiest and five being the hardest.

  1. Make whatever fills you with satisfaction.
  2. Eliminate any tools that don’t serve you.
  3. Work hard enough that you outgrow what does serve you.
  4. Be unrelenting in finding a system to support #1, especially if it means #2 and #3 are daunting.
  5. Repeat. (You’ll never get it perfect, just closer to it.)

Do that a few times, and you’ll hit what my gallerist Judith Rinehart and I call that the “ooey-gooey” – when an artist dives so deep into their practice that it becomes conjoined to the part of them that makes them, them. We’ve seen a lot of talented artists with great use of a medium, but they just haven’t hit that ooey-gooey center… yet.

You deserve a creative practice, a mix of methods and processes, a formula of art-making that is so distinctive to you that you get lost within it. So if my version interests you, please, borrow from it and apply it to yourself. I, for one, want to see what you make when you do (seriously, please show me!)

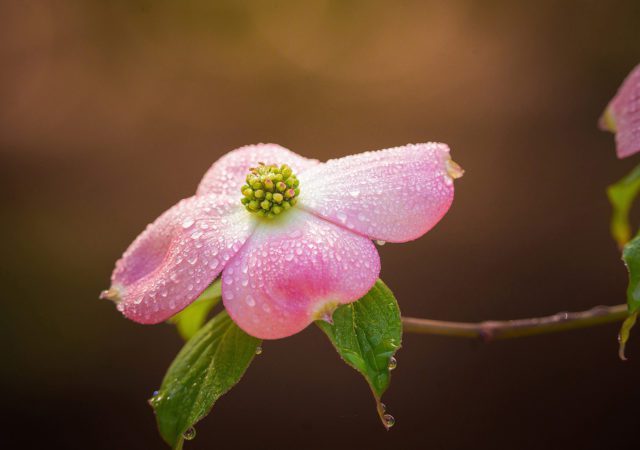
Macro Photography with a 600mm Telephoto Zoom Lens?

It’s not often that a photographer looks at a long telephoto zoom lens normally used for wildlife as a potential macro lens, but that’s exactly what I did with the SIGMA 150-600mm F5-6.3 DG DN OS | Sports. In fact, this lens has amazing close focusing capability that makes it perfect for macro, as well as birding, wildlife, sports, and so much more.


First Impressions

When I got it out of the box, the first thing I noticed is the size. It’s big. Anyone who considers the 150-600mm DG DN OS | Sports is going to know this already, but I am a little-lens shooter and this is probably the biggest lens I’ve ever used. However, it’s not as heavy as I expected it to be. No, it’s not a tiny, I series lens, but I thought it was going to be harder to heft and use than it really is. The weight actually makes it a bit more stable, which is an advantage when you’re shooting macro subjects. Since this one is designed for mirrorless camera bodies, SIGMA re-engineered and squeezed the same range (and improved sharpness) into a lighter lens. At just 4.6 pounds, it’s quite a difference from the 6.3 pounds of the original 150-600mm Sports lens for DSLRs.

Like any other SIGMA lens, it is sturdy and well-constructed. I am an avid Art lens user, so I’m definitely used to sturdy lenses, but the Sports lenses take it to a whole other level. I tend to beat up my lenses a little bit and I am sure that this lens could survive me! If you’ve read my other reviews for SIGMA, you might remember that I am a little bit of a klutz. I think I’ve dropped every lens that I own (and some loaners that I don’t own) in the grass at some point. When I’m changing lenses at my sessions or out teaching, instead of putting my lens in a bag, I will just place it on the ground and pick it up later. I’m thrilled to report that for the first time ever, I didn’t throw this lens on the ground or sit on it. At one point I was carrying this lens through some very tall grass and it was a wet morning, so both the lens and I were completely soaked. But it didn’t bother the lens since it’s dust and splash resistant.

The controls on this lens are familiar except for one. This lens features a new Zoom Torque Switch (Lock, Tight and Smooth). The “Tight” setting keeps the lens from zooming in or out unless you push it yourself. This was ESPECIALLY handy when wearing it on my Spider Holster, as the “T” setting kept it from unwinding to 600mm while hanging vertically from my hip.

This brings me to the next thing I noticed, which is the focus limiter switch. I think this is completely crucial to macro photography. Being able to tell the lens itself how far it should focus is what makes close-up photography possible. So while this isn’t necessarily a macro lens, it can behave like one in a lot of ways. The switch can limit the lens to work only within 10 meters of the lens, so while that’s still 30 feet away, it helps keep the lens from trying to focus on things far away.

This lens is also fast and smooth when focusing. It’s quick to focus and will catch things like bugs or lizards without taking so long to focus that they’re gone, plus it’s virtually silent so it doesn’t scare them away.

The minimum focusing distance changes with the focal length you’re using, and at 180mm, it’s about 23 inches. Since the lens is a little over 10 inches long, that’s about a foot from the front of the lens. Zooming in to 600mm makes that minimum focal distance a lot further away from you. Since this lens focuses so close, I was excited to try it out for “macro” photos. Now, strictly speaking, a macro lens is one that can reproduce the image on the sensor at 1:1 ratio, or life-size. I normally shoot macro with the 70mm F2.8 DG Macro | Art or 105mm F2.8 DG DN Macro | Art. This isn’t a true macro lens because it doesn’t go 1:1, but it’s pretty close at 1:2.9 at 180mm!

I tend to pixel peep a bit more than I should, especially on my macro images. This lens surprised me with how sharp it is. Not that I wasn’t expecting a sharp lens, but that I compare everything to my macro Art lenses. The 150-600mm is brilliantly sharp as long as your shutter speed (or handholding skills) are sufficient to freeze motion.

The bokeh is also really important to me. The out-of-focus areas in a picture can add to the story and help separate the subject from the background, so how it looks is something I pay attention to. I am picky and I don’t care for “crunchy” bokeh, where I can see edges to things in the background, so I was quite pleased to see that the bokeh for the 150-600mm is nice and smooth.


Let’s put it to the test!

I decided to take the 150-600mm DG DN OS | Sports out for a test drive in my front yard, a friend’s garden, the local botanical gardens, as well as to the farm where my husband works. Lots of fun places to see new things!

One thing I love with my usual macro lenses (the 70mm and the 105mm) is trying to photograph the dew at the end of grass blades. It’s always a challenge because it requires you to be patient and hold very still, so it’s always a great way to begin any nature photo walk. It’s humid in Georgia, and the local gardens have sprinklers running in the mornings as well, so the opportunity isn’t hard to come by. So I set the lens to 150mm, switched on the focus limiter so it would only go for what was close, and did my best. I was actually surprised at how well this lens handled this job. It’s important to remember that it’s not a macro lens, so I had to look at grass blades two feet away from me instead of a few inches, but WOW did 150mm ever deliver! The separation from the background is something I always look for and getting that with my 70mm macro lens is sometimes difficult.

Since it did well on grass blades, I knew the next test to give it was flower “portraits”. This means getting a picture of the whole flower instead of just a bug or a petal or tiny dewdrops. I usually use my 85mm F1.4 DG DN | Art or my 105mm F1.4 DG HSM | Art for pictures where I want a full flower, separated from the background, but the 150-600mm lens did it beautifully!

I always find tulips hard to make interesting. They’re so plain, and getting them separated from whatever is going on in the background is pretty crucial to allowing you to appreciate the beauty of the flower itself without incorporating the rest of the scene. But at 600mm, I was able to remove all the distractions of the background and achieve stunning results.

Another thing I’ve had a hard time capturing in the past is a nice shot of rose leaves with dewdrops on them. I can get close and get part of it, but the depth of field required makes it tough to show the magic of an entire set of leaves with water droplet jewels shining in the sun. Another shot nailed with this lens. I like this a lot because it means I can carry just one lens to effectively do two jobs: macro, plus flower portraits.

Next, I wanted to test backlighting, so I turned to the trees… dogwood trees in bloom. They were covered in dew as well. I handheld the lens above my head (the good light was even higher than my 6-foot self) and used my flippy screen on the back of my camera to compose. There was no banding or flare, which is pretty impressive! It also turns out that the tripod foot is a nice place to put your hand when taking pictures over your head.

For the morning in my friend’s garden, I enjoyed looking around for pictures I would normally have trouble with using a regular macro lens. I deliberately looked for flowers with a lot of front-to-back depth to them like azaleas and poppies.

With a typical macro lens, I usually focus on one part of the plant, but the 150-600mm was able to give me more depth of field, so I was able to capture single images that had whole flowers, front to back, in focus! I also spotted an anole lizard in the leaves of a canna lily, and because of the longer focal length, I was able to get a picture from far enough away that I didn’t scare it.

For my morning at the farm, I was looking for subjects I don’t normally find, and I was super excited to find five frogs there. Even one per year is pretty good for me, so to see five was the best day ever! Four of them were green tree frogs like I expected to find, but the last one was actually one I’ve heard but never seen – a spring peeper! I was able to get an overhead photo of this guy by getting the lens right up to the iris leaves where he was sheltered. I wouldn’t have been able to get this shot with a shorter lens because I would have moved the leaves and scared him away. I did try to pick him up to put him somewhere better for photos, but he jumped away before I could get to him. Though I was excited for that find, I think my favorite frog photo (say that five times fast) of the day was one of a very well-fed green tree frog hanging on some leaves close to a yellow iris flower.

I repeated the same trick of putting my camera over my head to get carpenter bee butts in a rhododendron on the farm.

I was also able to easily focus on a pollen-covered spiderweb on a fence. The focus limiter switch helped again here, telling the lens to focus on only what was close. Despite its huge focal range, the lens had zero trouble getting that web in focus quickly and it didn’t have to hunt all over for it.

I also loved the results for the farm’s chicken-coop-eating rose bush (her name is Bertha). They’re soft on the back petals, but I was able to achieve greater depth of field with this lens, making the center of the flowers pop with crisp details.


Will you shoot macro with this lens?

While the SIGMA 150-600mm F5-6.3 DG DN OS | Sports isn’t a true macro lens, it can certainly be used as one! Not only does it get amazing close-up photos, but it’s ability to zoom out and get flower portraits makes this a hardworking multi-job lens. It’s quick and sharp and not as heavy as I expected. It was easy for a seldom-zoom girl like me to use, and I love the images I was able to capture with this. Maybe you’re looking for a longer macro or perhaps you already own this lens for wildlife and didn’t know it could go close too!

Taking Photos for Take Your Child to Work Day

By Avery Howard

This is a special guest blog post written and photographed by Avery Howard, 2nd grade daughter of Sigma’s chief blogger/tech editor, Jack Howard, for “National Take Your Child to Work Day”

Yellow and White Daffodils. Sigma 60mm F2.8 DN Art lens on Olympus OMD-E5 Photo © Avery Howard

The first concept we got to explore for Take Your Child to Work Day was to take photos of flowers and especially red tulips, yellow daffodils, dandelions, yellow tulips, and bicolored daffodils.

We experimented with different in-camera Art Filters to see how effects change the feel of a picture. This is Soft-focus.  Photo © Avery Howard

This is a black and white film grain effect! Photo © Avery Howard

And here is the non-filtered version. Photo © Avery Howard

The second concept was to take other nature photos, including a leaning tree, riverbank, three pine cones &  two big sticks. My dad and I identified great photos and the angles to shoot with the two lenses. I also learned how to take photos of landscapes and great shots of people today! (And by “people” I really mean Pato the duck!).

Looking at trees through a hole in fence post. We also tried the 16mm F1.4 DC DN | C lens as well for this picture. Photo © Avery Howard

A portrait of my duck, Pato, taking field notes under the daffodils.

After we got back to my dad’s home office we picked out our favorite photos and prepared them for the website using Photoshop. Some of the photos were better than others and these were the ones we picked. We looked at the framing, if it was blurry or sharp, and the colors, to decide which we liked best.

A picture of me taking a picture of my dad! Photo © Avery Howard

A picture I took of my dad taking a picture of me! Photo © Avery Howard

I also learned a close-up photo is called a “macro”. This little flower is smaller than a quarter. It was helpful to use a tripod to frame this picture! (We used a Sigma 18-300mm C on a Reb T3i) Photo © Avery Howard

Then we wrote the blog in Google Docs (and I showed my dad how to use Google Voice typing, too!) and uploaded it into a program called WordPress and then we published it. You are reading it now. I hope you enjoyed it!

The Sigma 180mm F2.8 EX DG OS HSM Macro Lens for Close-up Work

The Sigma 180mm F2.8 EX DG OS HSM Macro lens is the biggest, longest macro lens in the Sigma lens catalog. This telephoto lens offers true life-sized reproduction with a 1:1 maximum magnification ratio. Incredible sharpness—thanks to its state of the art optical design—Optical Stabilizer, and a three-zone focus limiter make this a serious lens for advanced macro photographers.
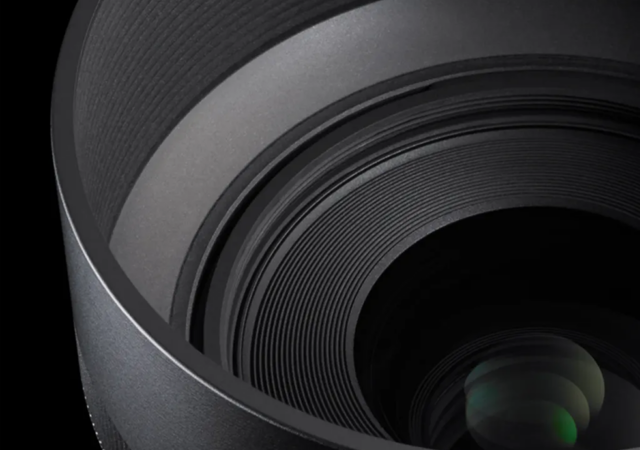
The Sigma 180mm F2.8 EX DG OS HSM Macro lens.

This is a lens with serious presence. At 3.7 x 8.0 inches and 57.8 ounces, it’s a touch bigger and heavier than the 70-200mm F2.8 EX DG OS HSM lens. 19 elements in 14 groups, including three FLD elements, ensure incredible real-world image sharpness as demonstrated in the MTF chart.

The Sigma 180mm F2.8 lens can capture detail at 1:1 magnification at its closest focus distance of 18.5 inches from the focal plane. At this focal length and close-focusing distance, depth of field is incredibly shallow, even when stopped down. This image of a US 25 cent piece featuring Mississippi on the reverse was captured at F/11. A studio strobe with a shoot-through umbrella lit the scene, captured at 1/200 F/11 ISO 100 on a Rebel T3i (288mm effective focal distance on this APS-C camera.)

The MTF Chart for the Sigma 180mm F2.8 EX DG OS HSM Macro lens illustrates its exceptional sharpness.

This is a lens for experienced macro photographers who want a longer focal length and greater working distance for specialized applications. And while it is a big and weighty lens, internal focusing and Optical Stabilizer mean, respectively, that the lens barrel remains the same length at all focal distances, and that it can be used in the field without a tripod at slower shutter speeds, both of which are really nice touches.

Continue reading The Sigma 180mm F2.8 EX DG OS HSM Macro Lens for Close-up Work

First Look: Sigma 30mm F1.4 DC HSM | Art

The Sigma 30mm F1.4 DC HSM | Art lens replaces the very popular 30mm EX DC HSM lens as the fast, standard prime designed exclusively for DLSRs with APS-C sensors including the Sigma SD1 Merrill, the Canon EOS Rebels, 60D and 7D and a number of Nikon models including the D7100, D90, and D5100. And based on the updates and upgrades, the 30mm F1.4 Art lens is going to make a lot of photographers very happy.

The shallow depth of field at F1.8 draws your eyes right to the hands and starfish. The Sigma 30mm F1.4 DG HSM | Art lens is a super-sharp standard prime for APS-C cameras. 1/3200 F1.8 ISO 100 on the Canon Rebel T3i.

As an Art lens the 30mm F1.4 DC HSM | A is built to the same design and performance standards introduced with the 35mm F1.4 DG HSM | Art lens, the first lens in this line to be announced. In fact, this lens feels like a scaled-down version of that fast, full-frame prime lens. And it’s not simply a cosmetic change. The new 30mm F1.4 has a completely new optical design, with more lens elements, including a double-aspheric lens which minimizes spherical distortion.  As far as focusing goes, there’s been a lot of advancements since the original 30mm F1.4 was released in 2005.  The autofocus is much faster, and much more quiet. And the full-time manual focus ring is very responsive for complete creative control. And as a Global Vision lens, each and every 30mm F1.4 DC HSM | Art lens is individually tested on the A1 MTF device at the Aizu, Japan factory.

Continue reading First Look: Sigma 30mm F1.4 DC HSM | Art

Exit mobile version