
Something that we can all relate to is the beauty of a memorable sunrise or sunset. Everyone from beachgoers to the country sky — there’s always a sunrise and sunset somewhere nearby! But on the other hand, photographs of sunsets and sunrises can feel a bit repetitive if it’s nothing more than the sun disappearing beyond the horizon. By aligning the sun with landmarks, natural features and even yourself, you can take the basic sunset shot to a whole new level!
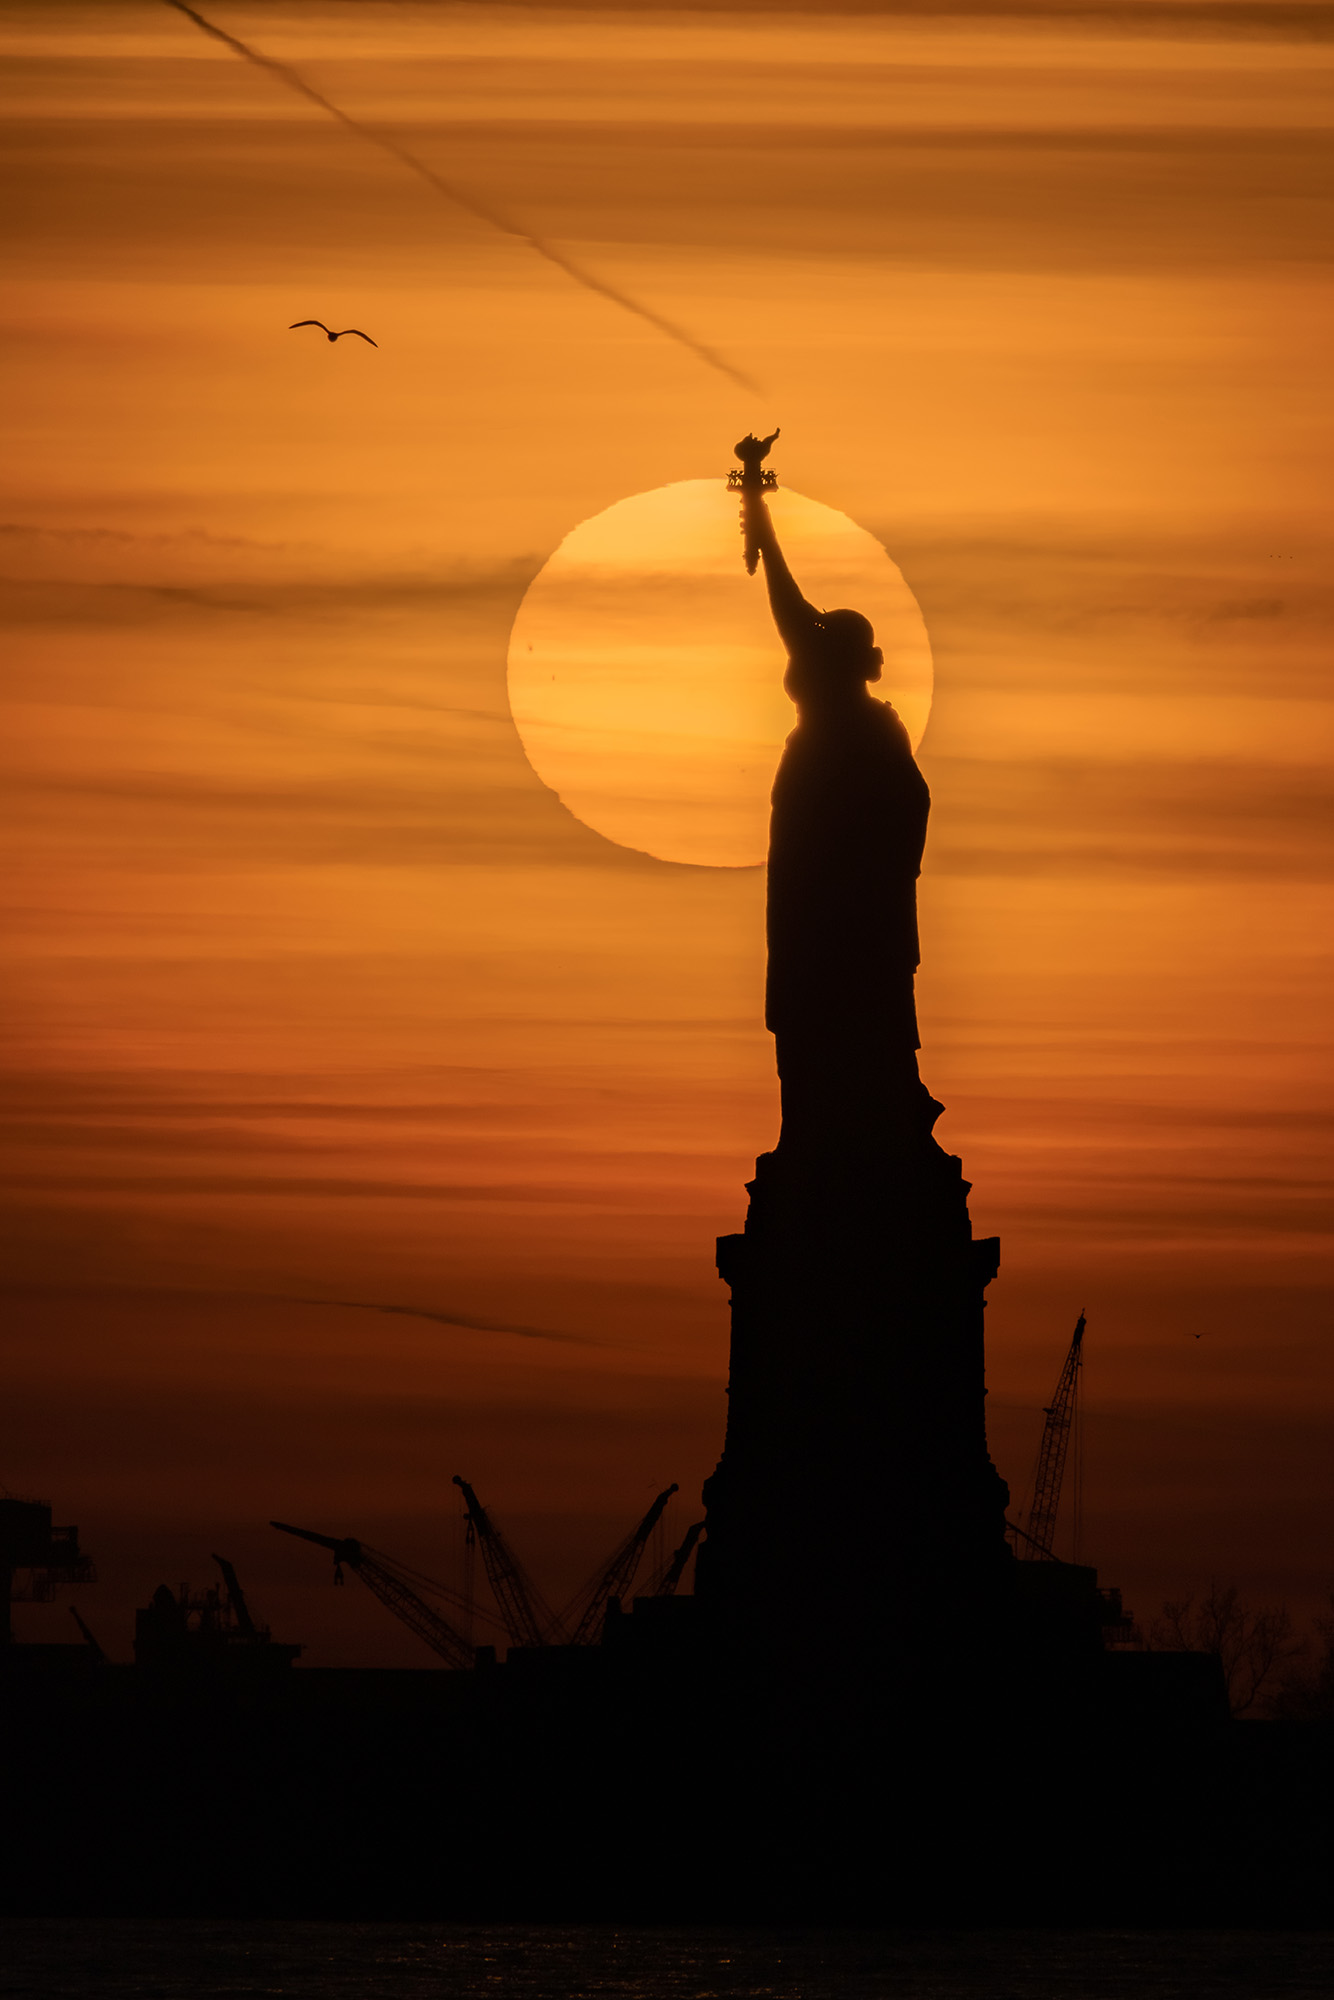
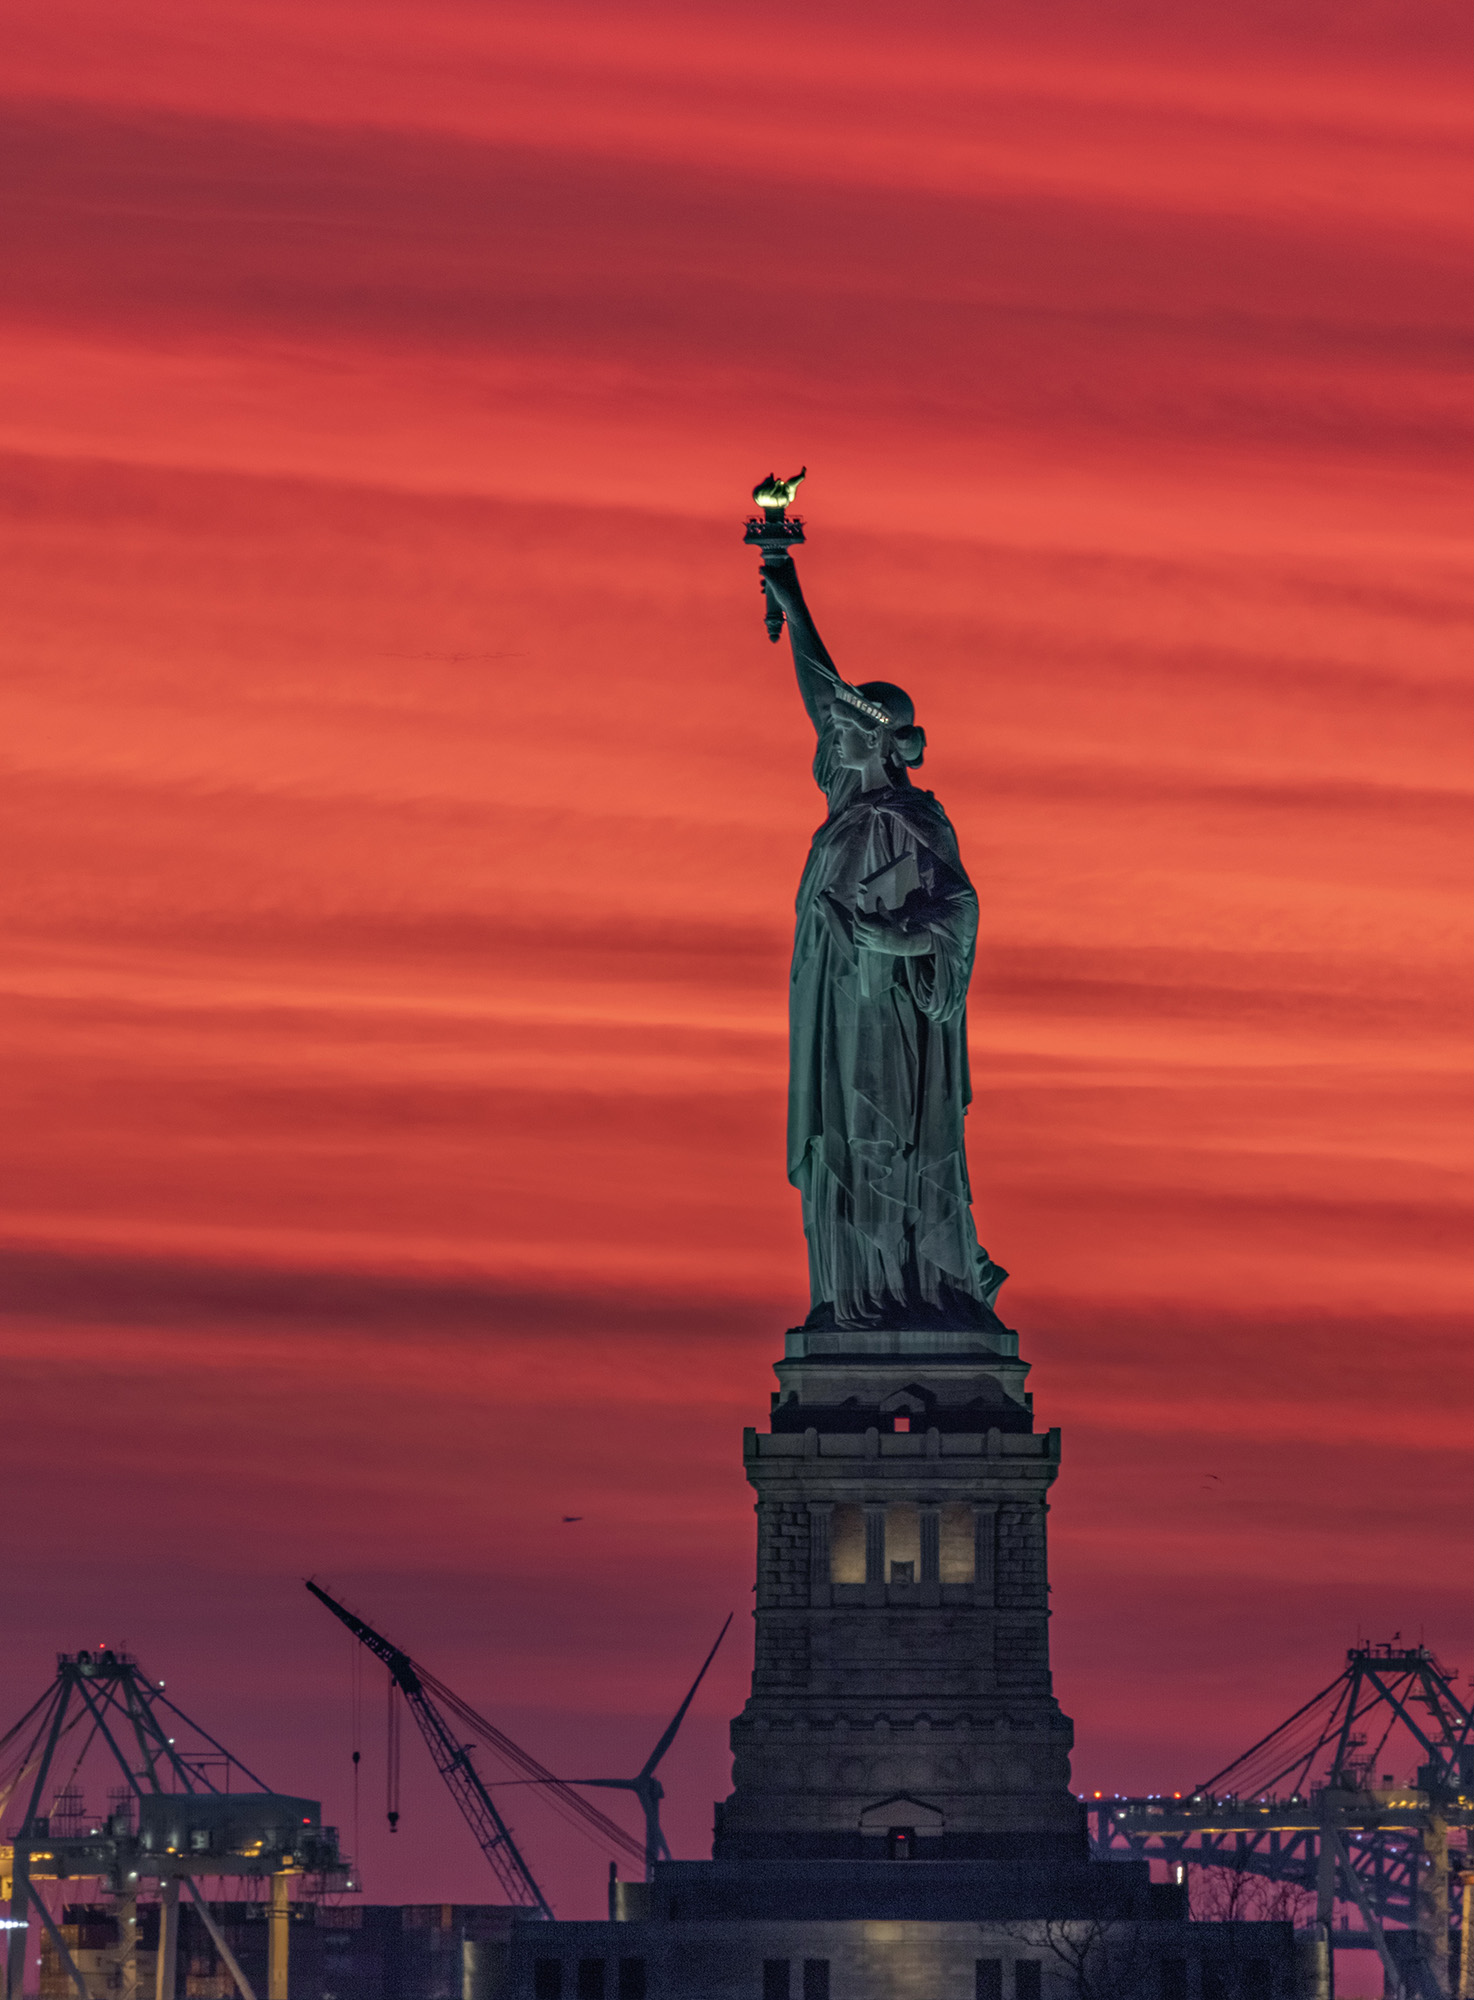
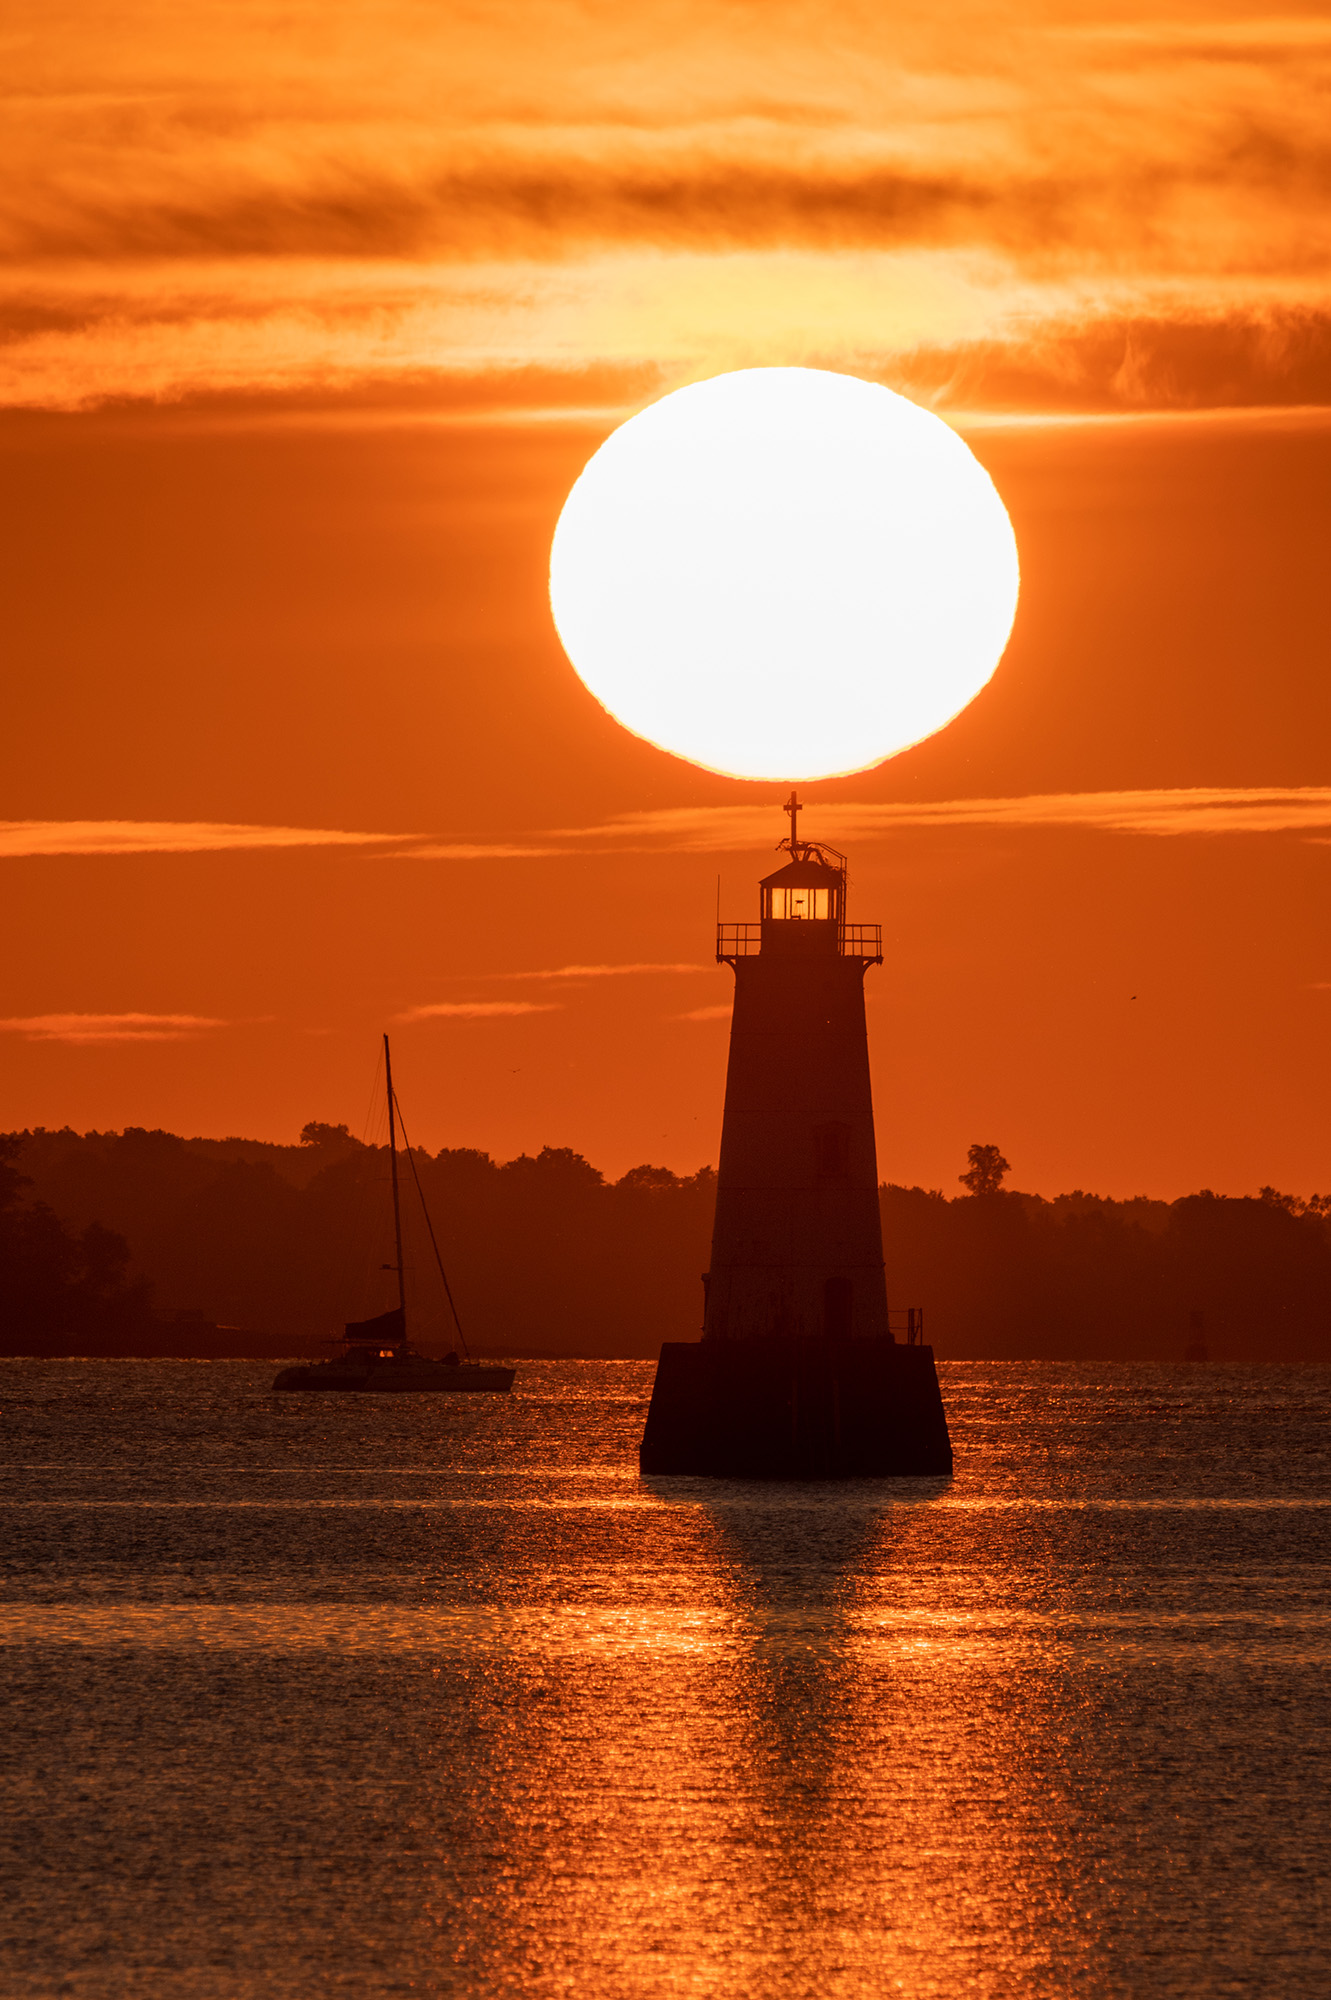
SIGMA 60-600mm DG OS HSM | Sports on Canon EOS R5 – 600mm, 1/8000s, F16, ISO 100
Plan Your Shots Ahead of Time
Taking compelling photos of sunsets and sunrises is often about being in the right place at the right time, but you can’t leave that up to chance. Planning is essential, and without a solid plan, you might be heading home without the shots you envisioned.
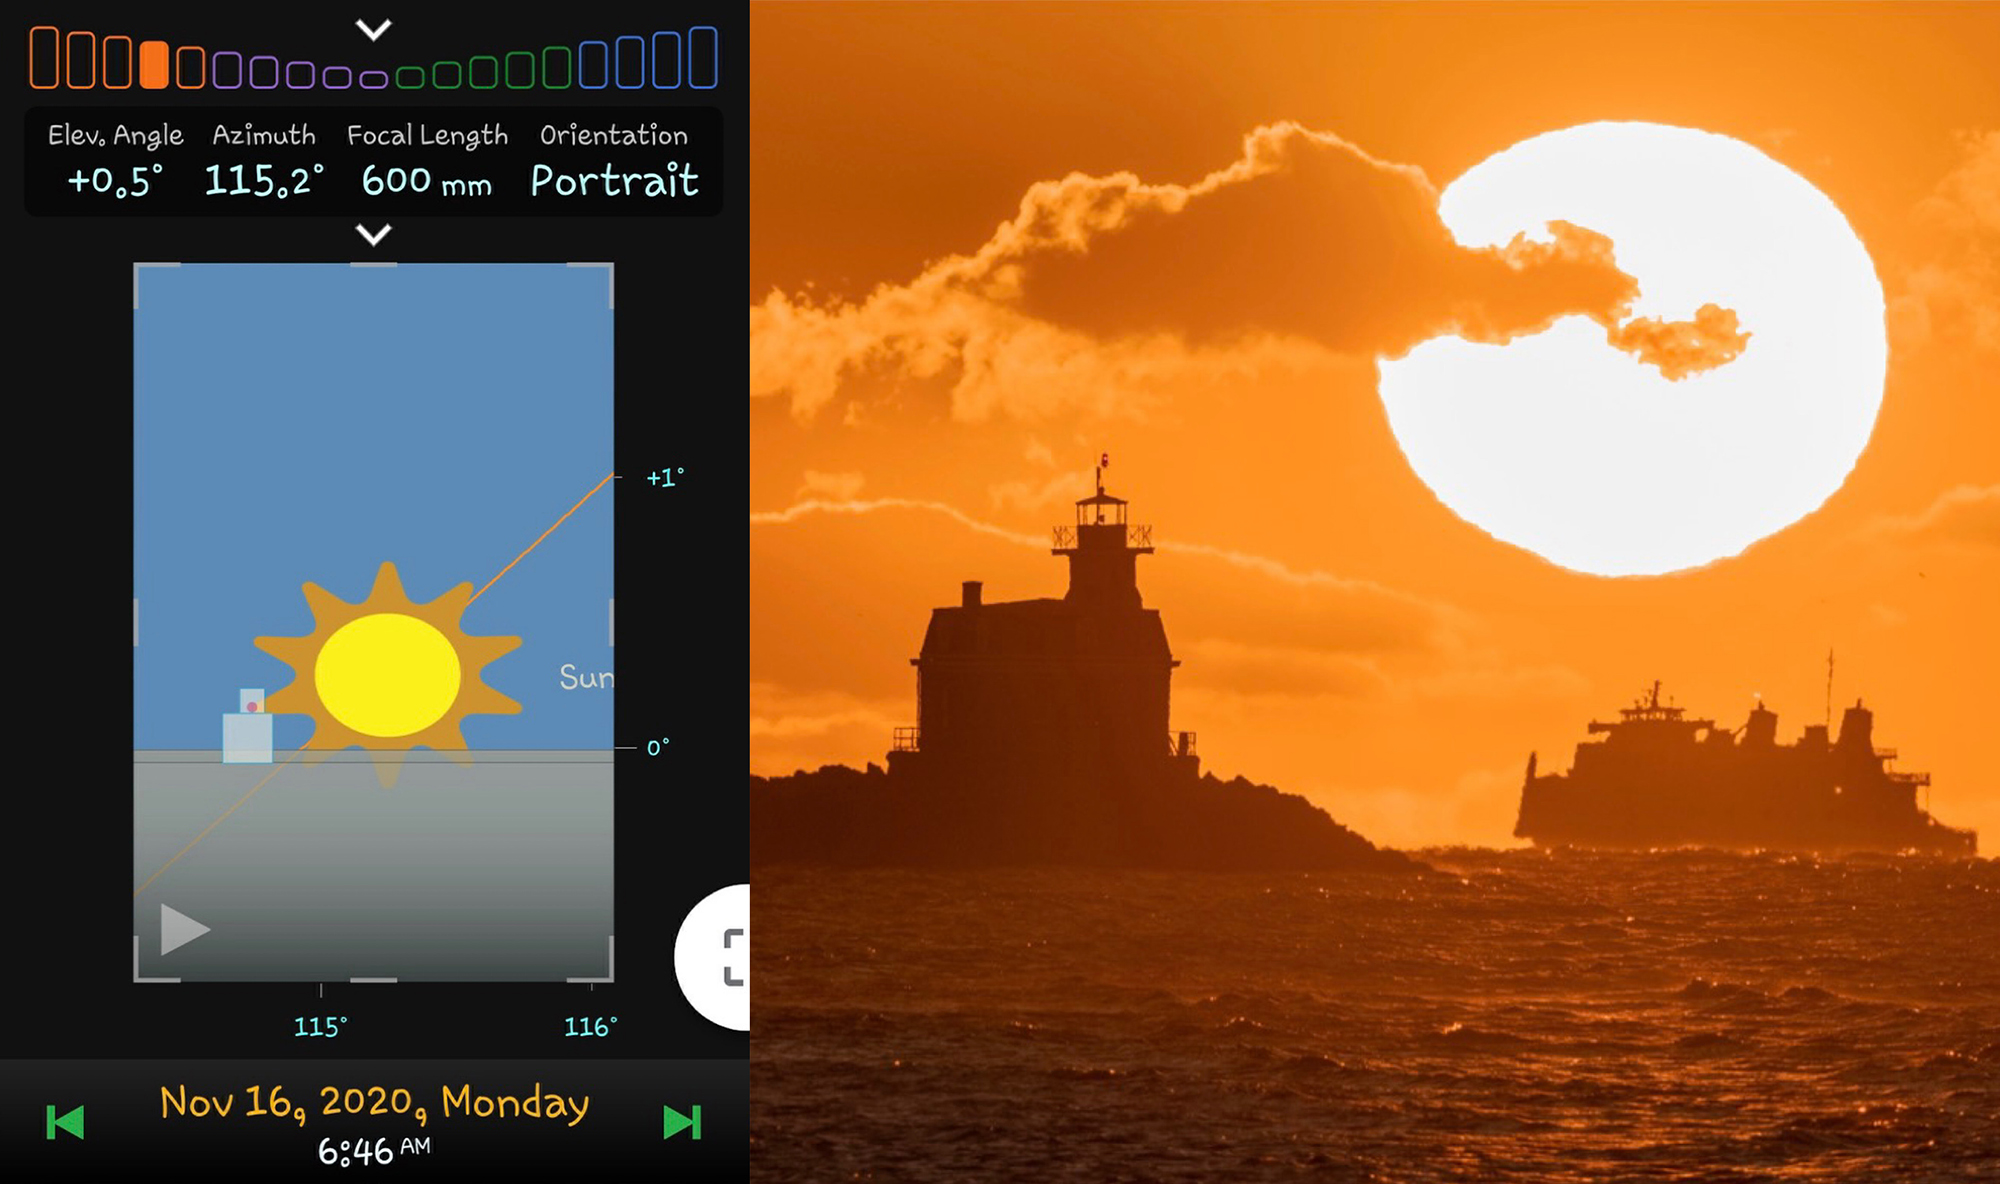
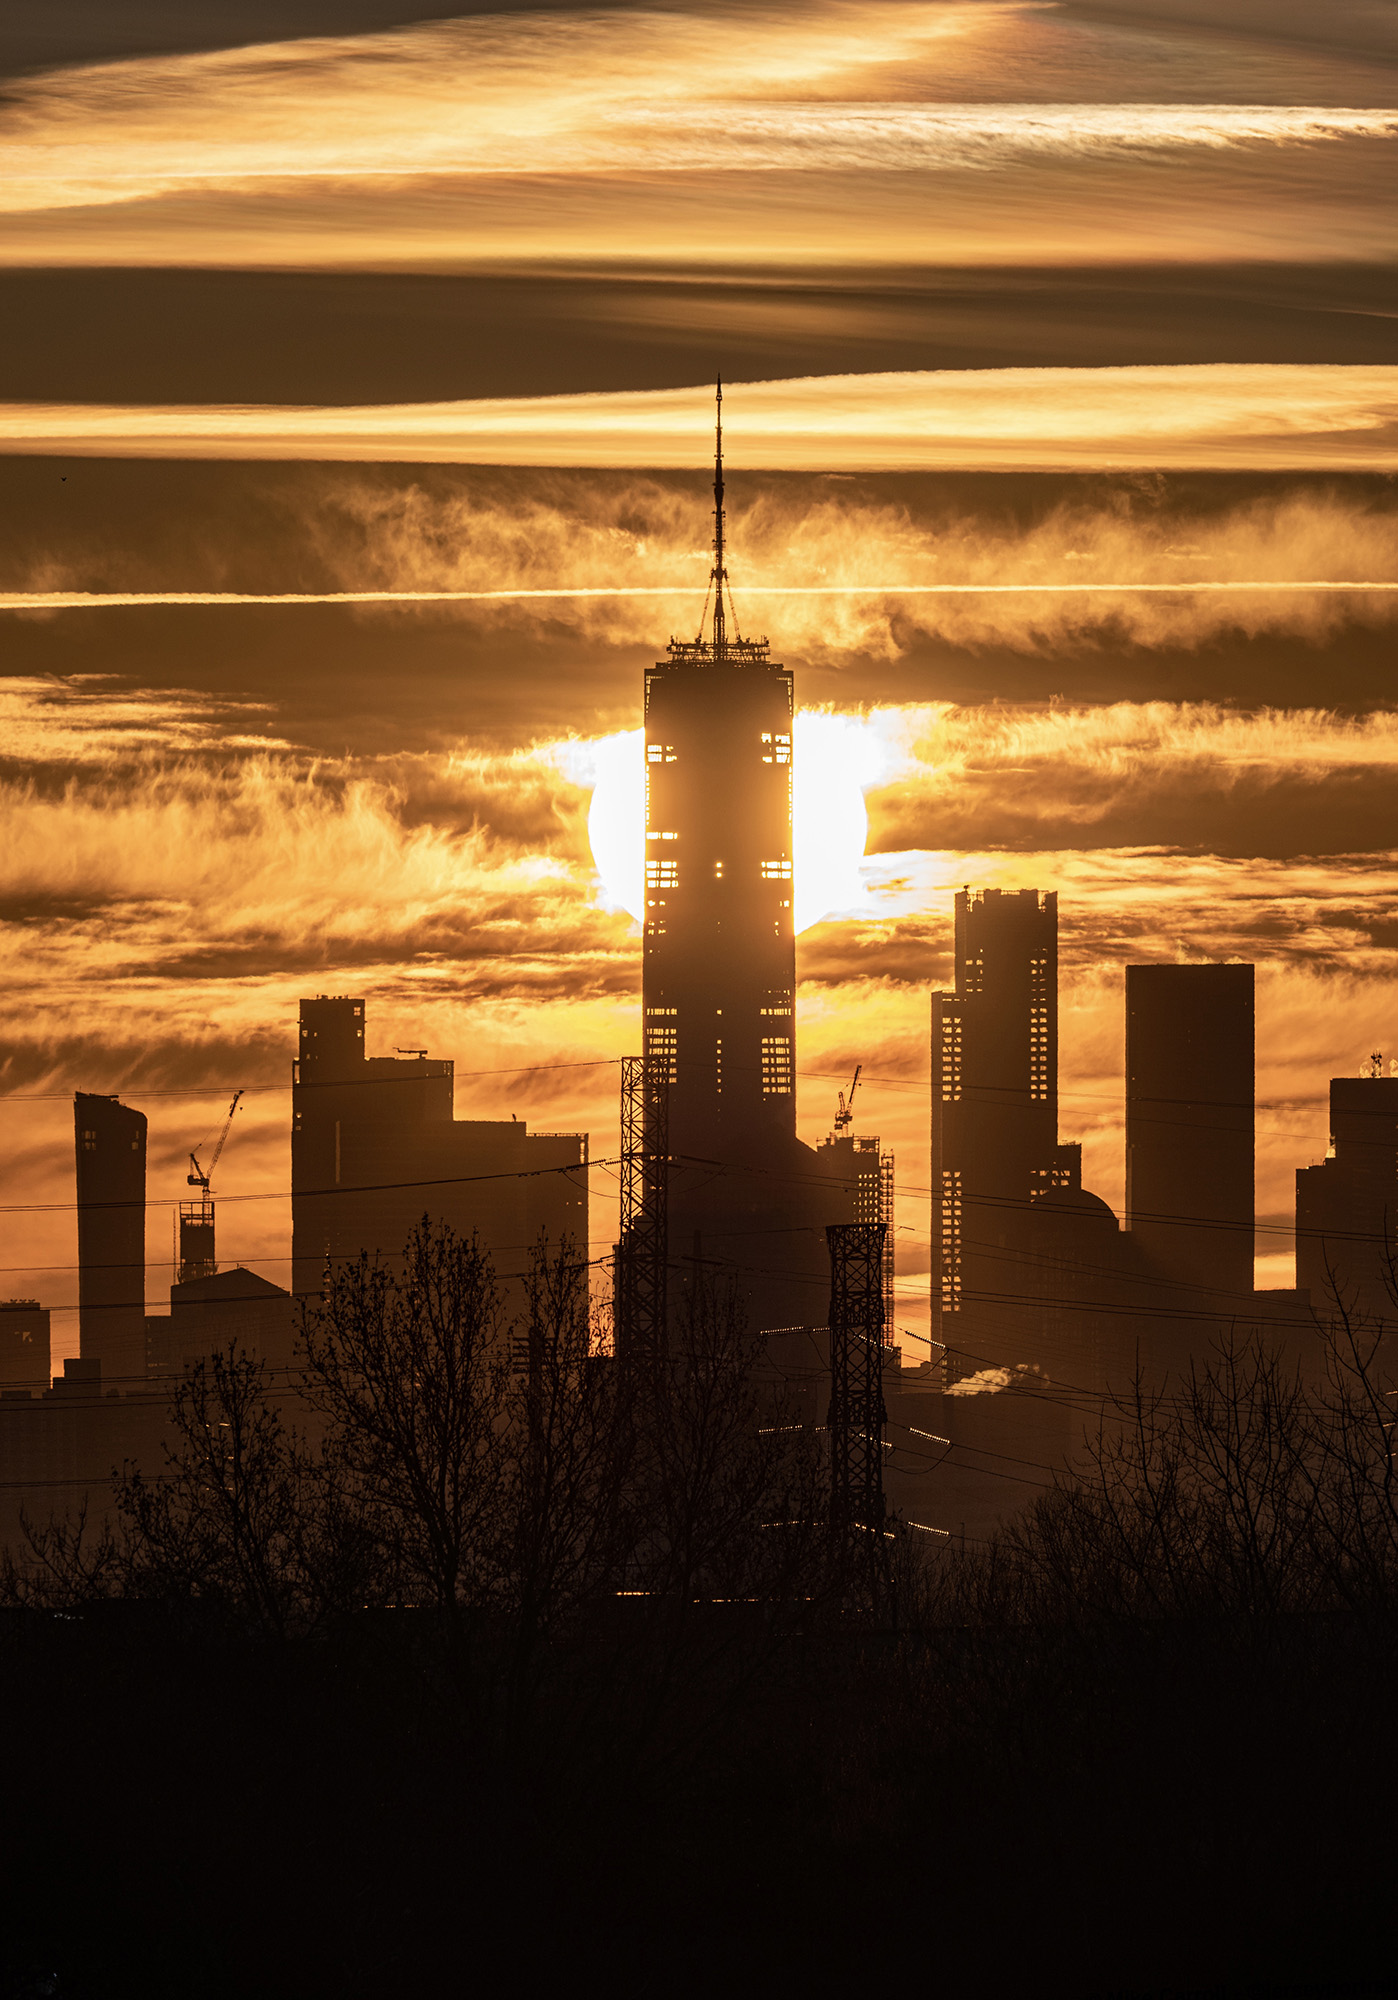
Thankfully, modern technology has made the process of researching and scouting much easier, especially when it comes to the sun, moon and stars. I like to incorporate local skyscrapers and lighthouses into my sunset shots, so I take advantage of Google to look up the heights of buildings, and I use the PhotoPills app to find how the sun will align with these landmarks. Another app, Planit Pro, gives you a basic visual representation of where the sun will be. This is incredibly useful, and helped me nail this shot that was featured by National Geographic!
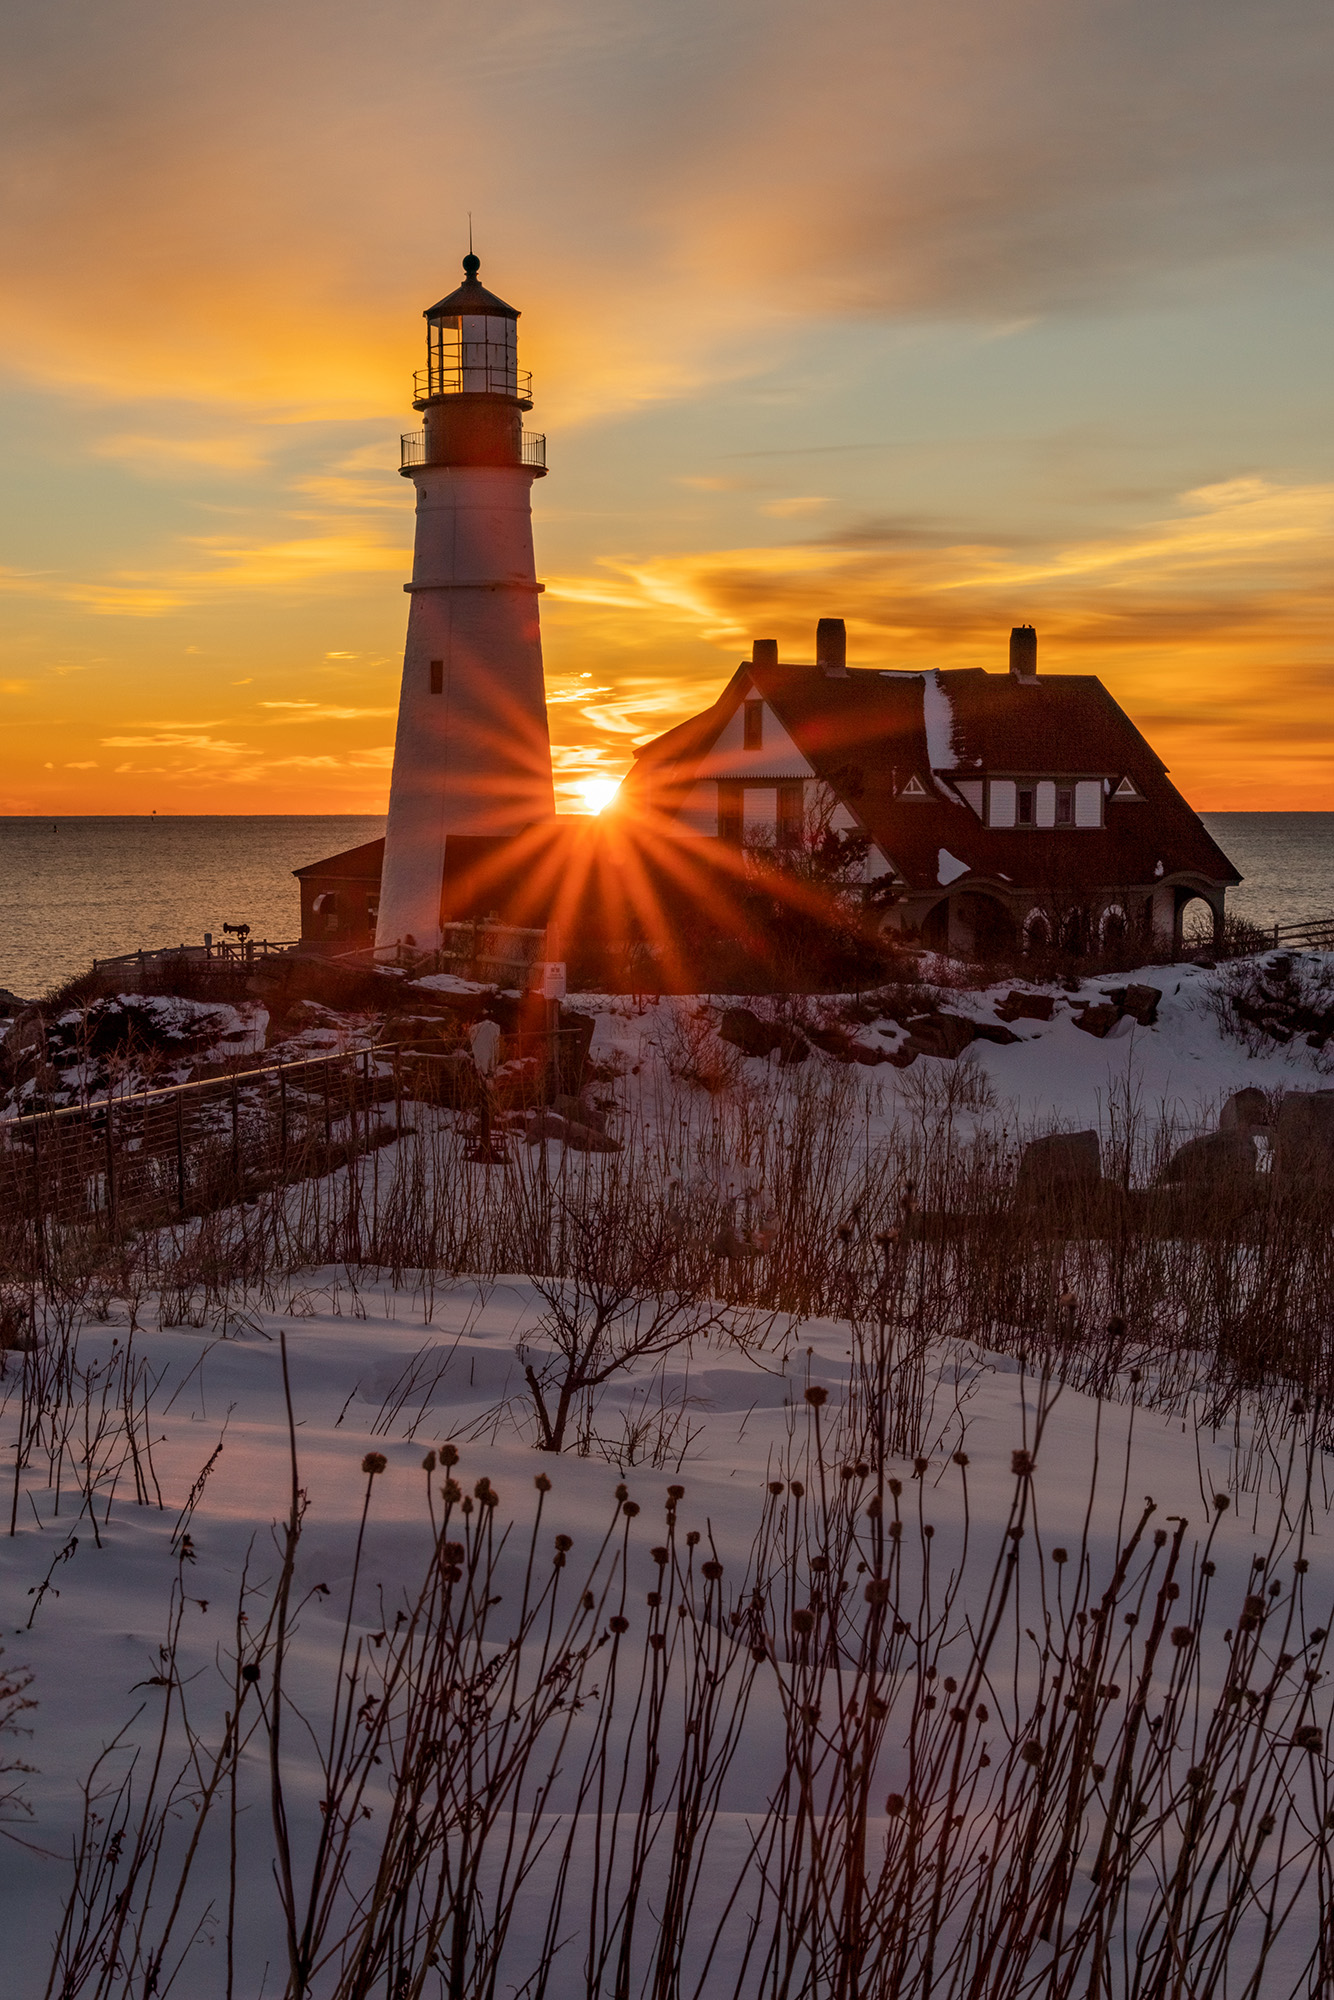
SIGMA 60-600mm DG OS HSM | Sports on Canon EOS R5 – 600mm, 1/2000s, F9, ISO 100
Of course, it helps to live near a metropolitan area where skyscrapers, statues and monuments are everywhere, or a beach town with lighthouses and shorelines, but if you don’t live in an area with any of the above? If you live in a more rural area, look for a farmhouse or some mountain tops. If you live near the desert, try to align the sun over a cactus, rock formation or other interesting natural landmark. Use your imagination, look closely at your surroundings, and you’ll be able to come up with some creative points of view.
And even if you can’t think of something, there’s always that burning sky to look forward to. Check the forecast for high clouds and download some apps that predict an epic sunrise or sunset. It’s best to arrive 45 minutes prior to sunrise or sunset so you don’t miss that epic burn!
SIGMA 60-600mm DG OS HSM | Sports on Canon EOS R5 – 600mm, 1/15s, F6.3, ISO 100
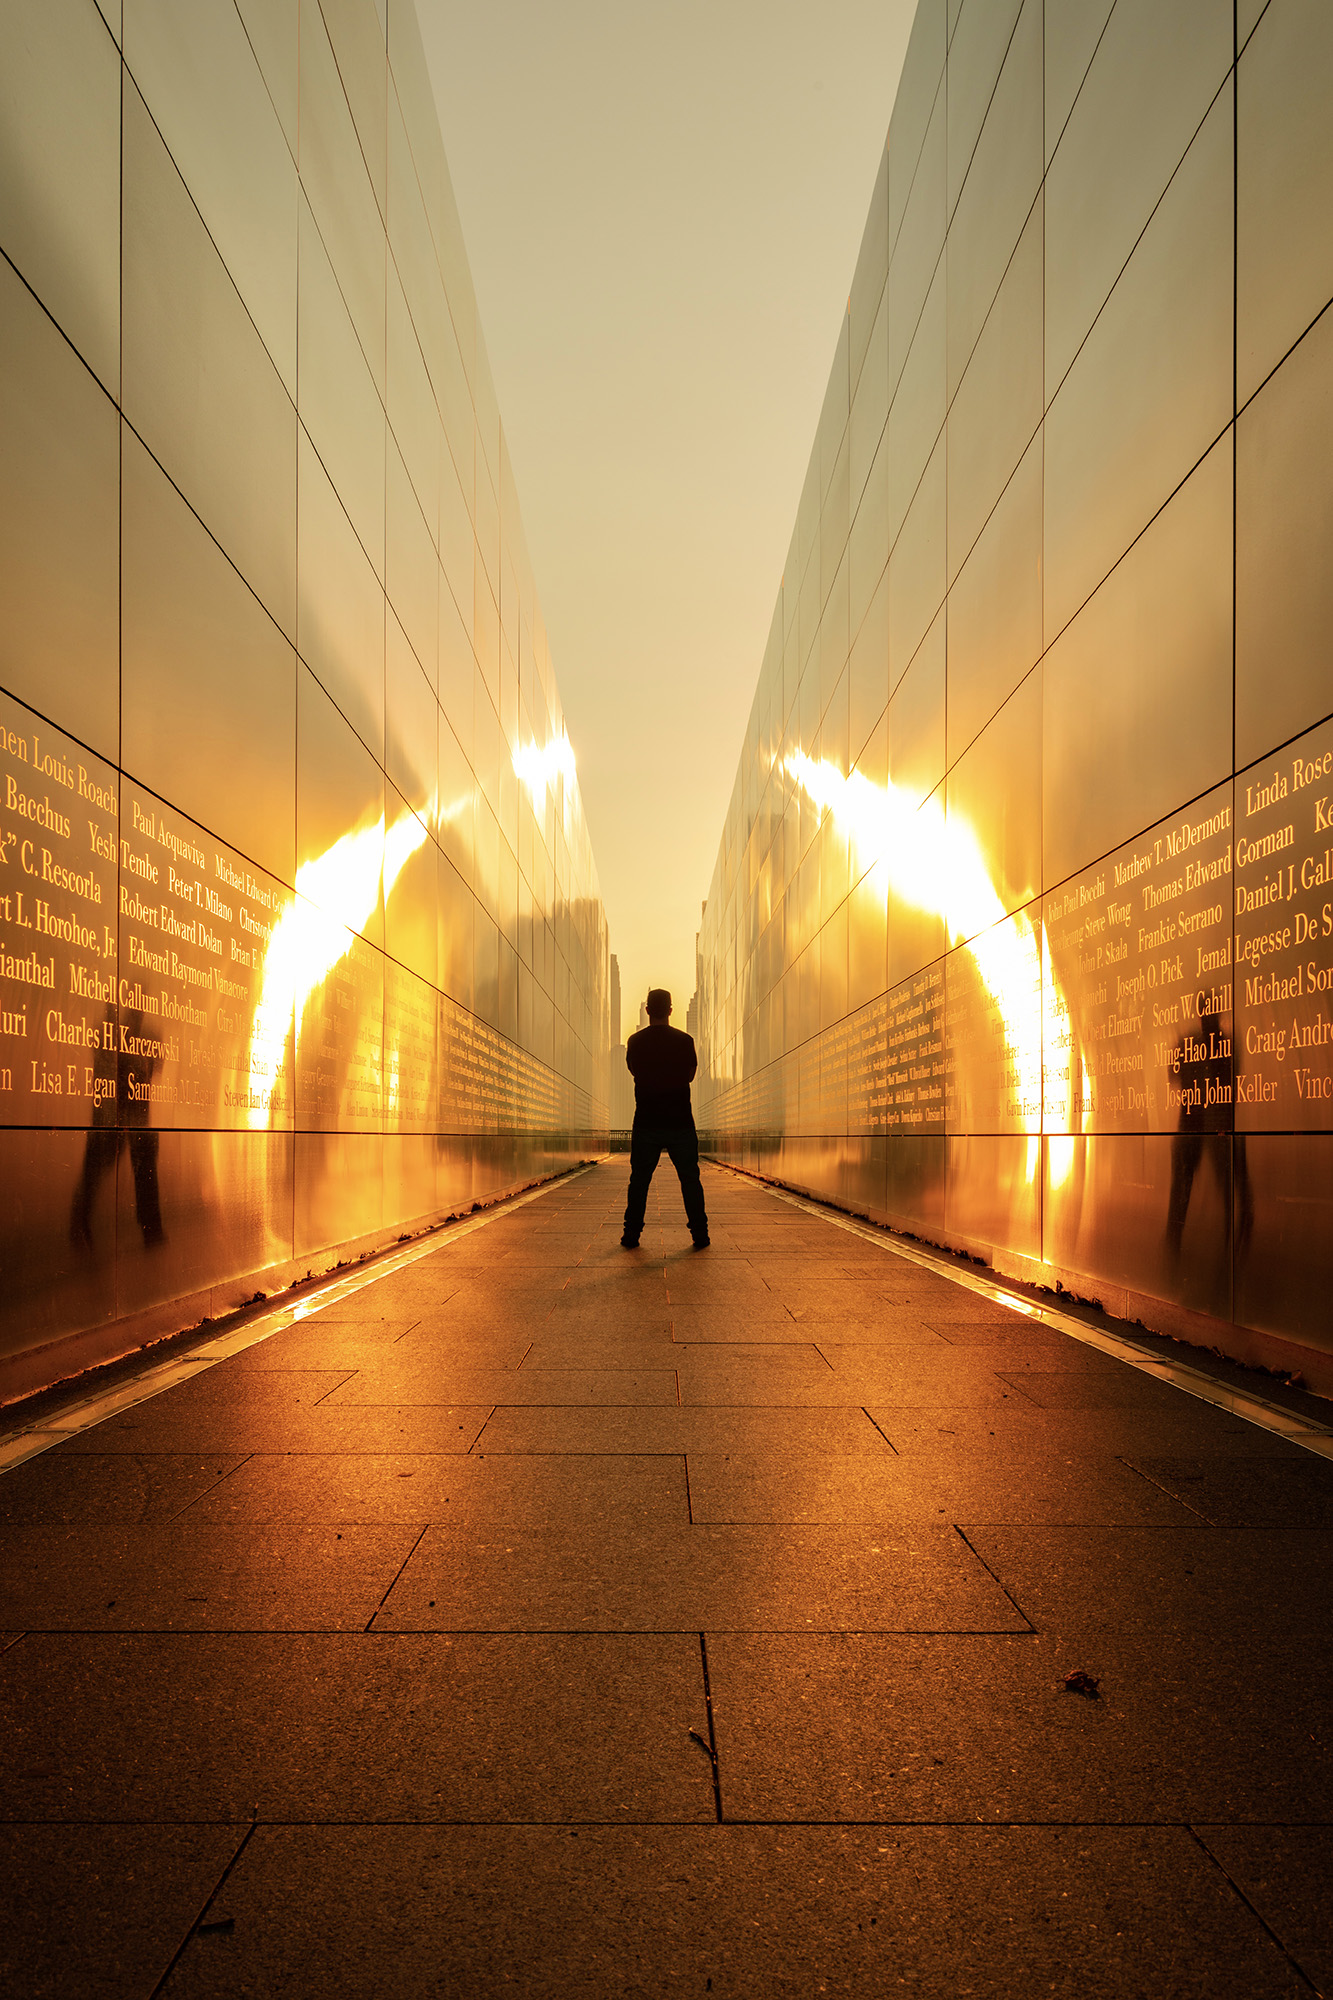
Try a Self-Portrait with the Sun!
You don’t always have to align the sun with a structure or natural feature. You can incorporate yourself into the frame and take a creative self-portrait! For this image below, I knew that the sun was going to make its way over to the famous Empty Sky Memorial in Jersey City, NJ, and shine on the memorial. I set up a timer and took a few shots. It helps to have someone with you so you can make sure that you’re standing in the correct spot for your desired alignment.
Tips for Shooting Into the Sun
You need to be careful while shooting into the sun. Make sure you’re using proper exposure so you don’t blow the sun out! It’s best to underexpose your image by a stop or so, that way, you can bring up your shadows and lower your highlights in post later. If you’re shooting at your camera’s fastest shutter speed and you’ve maxed out your aperture, try using a neutral density (ND) filter.
If you’re looking to capture a sunstar (aka sunburst) — like the images below — or just shooting directly into the sun, you can start with an aperture of F18 and work your way down to F22. You will be able to create a pretty interesting sunburst effect, which will look different depending on the number and shape of the aperture blades of the lens you’re using.

SIGMA 70-200mm F2.8 DG OS HSM | Sports on Canon EOS R5 – 114mm, 1/500s, F22, ISO 100
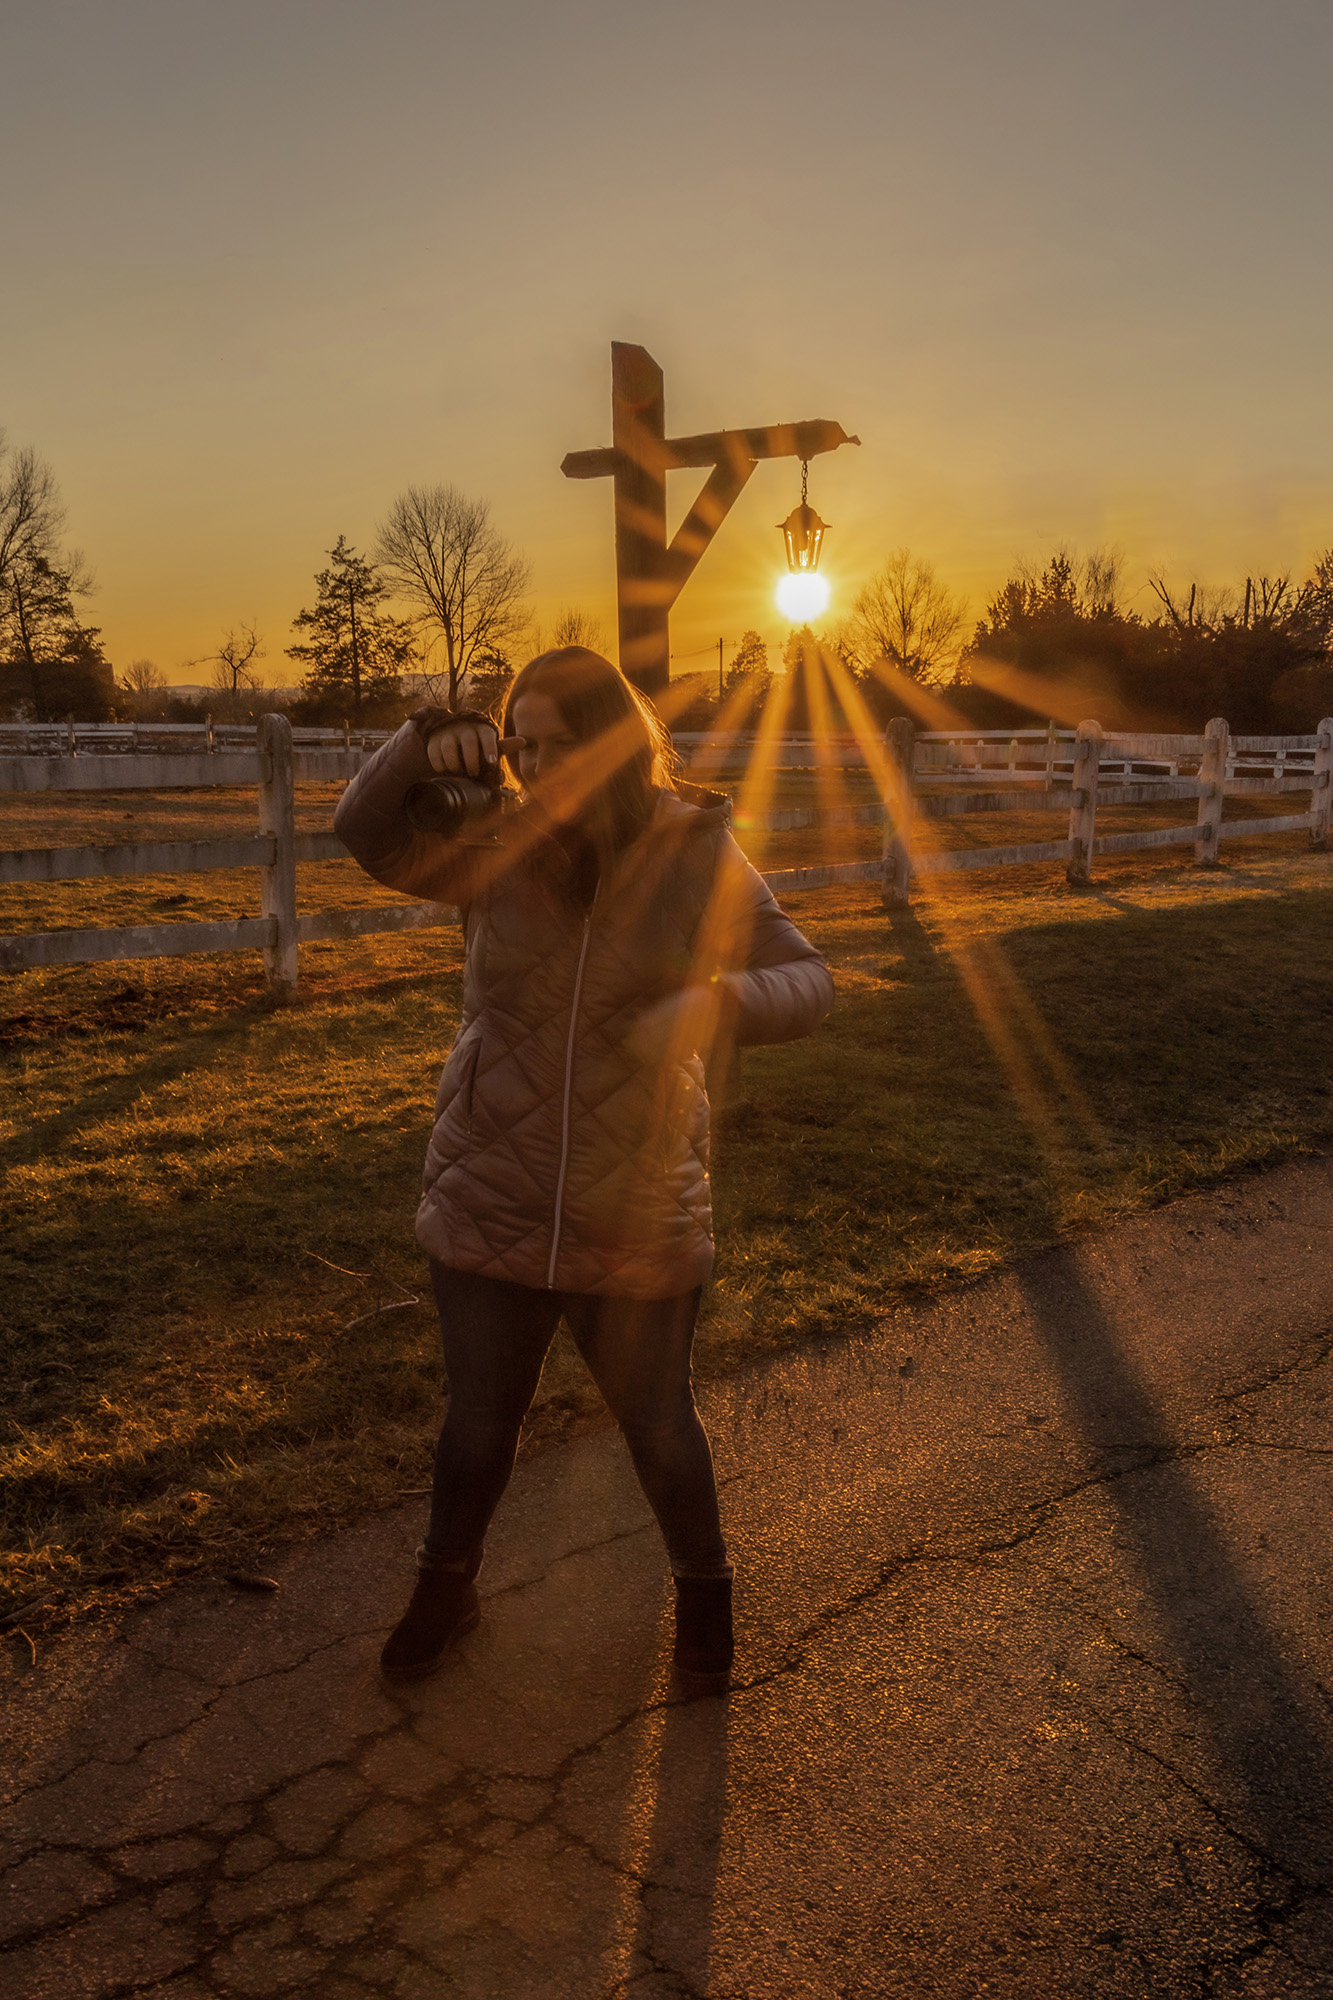
SIGMA 24-105mm F4 DG OS HSM | Art on Canon EOS R6 – 24mm, 1/80s, F20, ISO 100
One more thing that I’d like to touch on, is if you’re seeing any smearing or ghosting on your sun images, try switching your camera to electronic / silent shutter. I discovered this issue on some mirrorless camera bodies. Additionally, if you’re shooting with a mirrorless camera or with a DSLR in live view, try to avoid aiming the camera directly at the sun for too long, since this can potentially cause damage to the sensor. I’ve personally never encountered any issues, but it is worth mentioning for safety’s sake.
Choosing the Right Lens for Sunsets and Sunrises
Telephoto Lenses
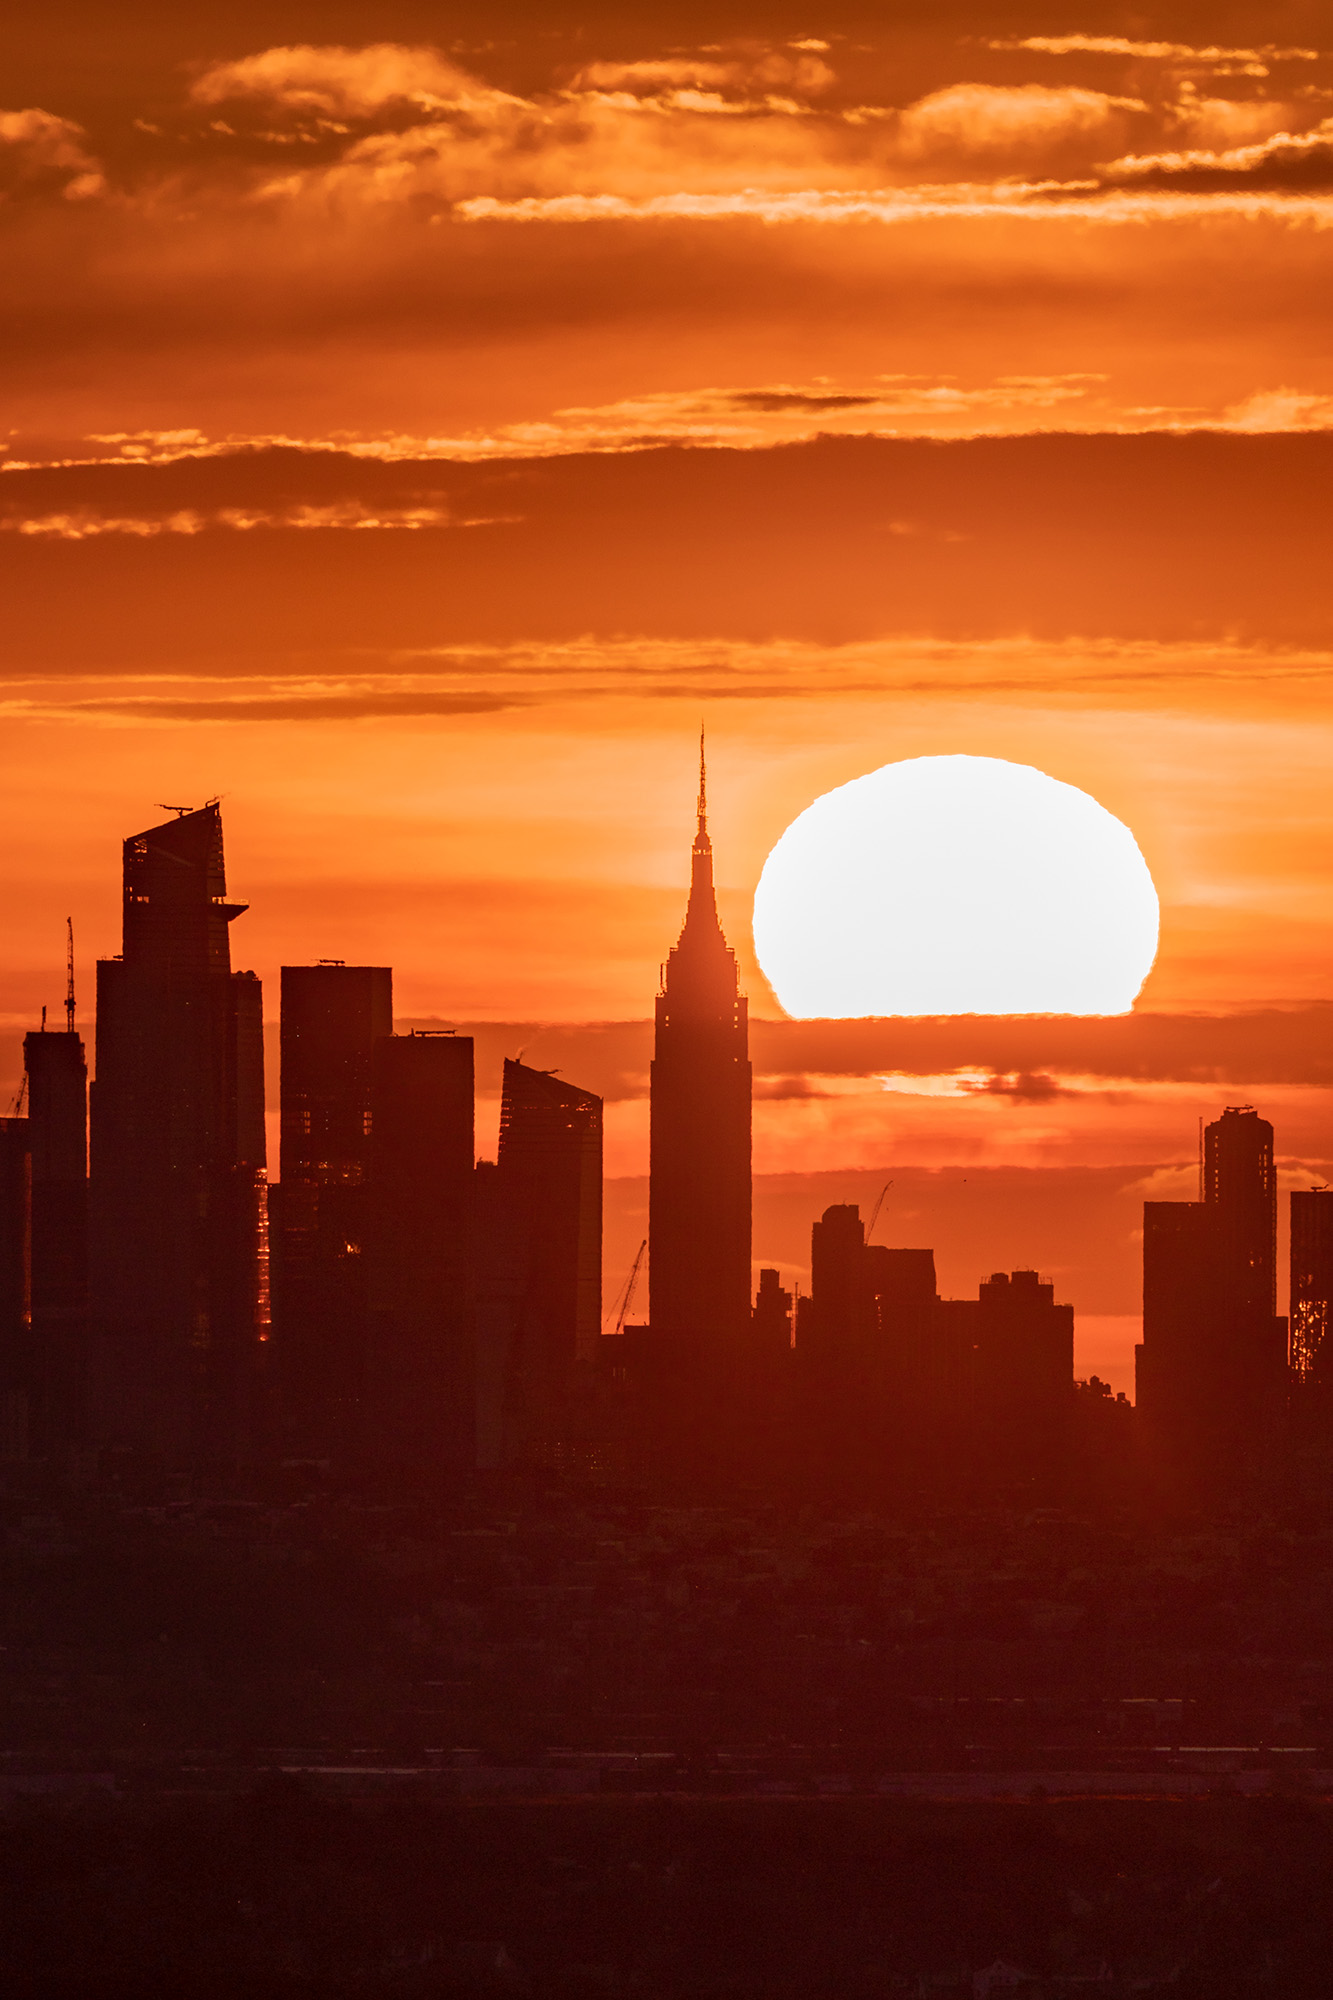
When it comes to telephoto lenses, my first choice is the SIGMA 60-600mm DG OS HSM | Sports. The reason I reach for this telephoto lens first is because I typically plot my shots where is subject is anywhere from 3 to 14 miles away! I often use the 60-600mm to take photos from this distance of the Freedom Tower at the World Trade Center, which is 1,792 feet tall. If I happen to have a closer vantage point, I’ll go with the SIGMA 70-200mm F2.8 DG OS HSM | Sports, which offers a larger maximum aperture for when the light starts to fade.
The other benefit of using a super telephoto lens is that I can achieve great compression as I zoom into the sun. The sun will get bigger and bigger as I zoom in closer (see images below). For example, if I’m plotting a lighthouse and its height is 50 feet, the sun is going to look very large in the frame as I zoom in to 600mm because the lighthouse is very small. In some cases, the sun can actually be larger than the subject! It all depends on the height and distance of your desired target.
Wide-Angle and Standard Zoom Lenses
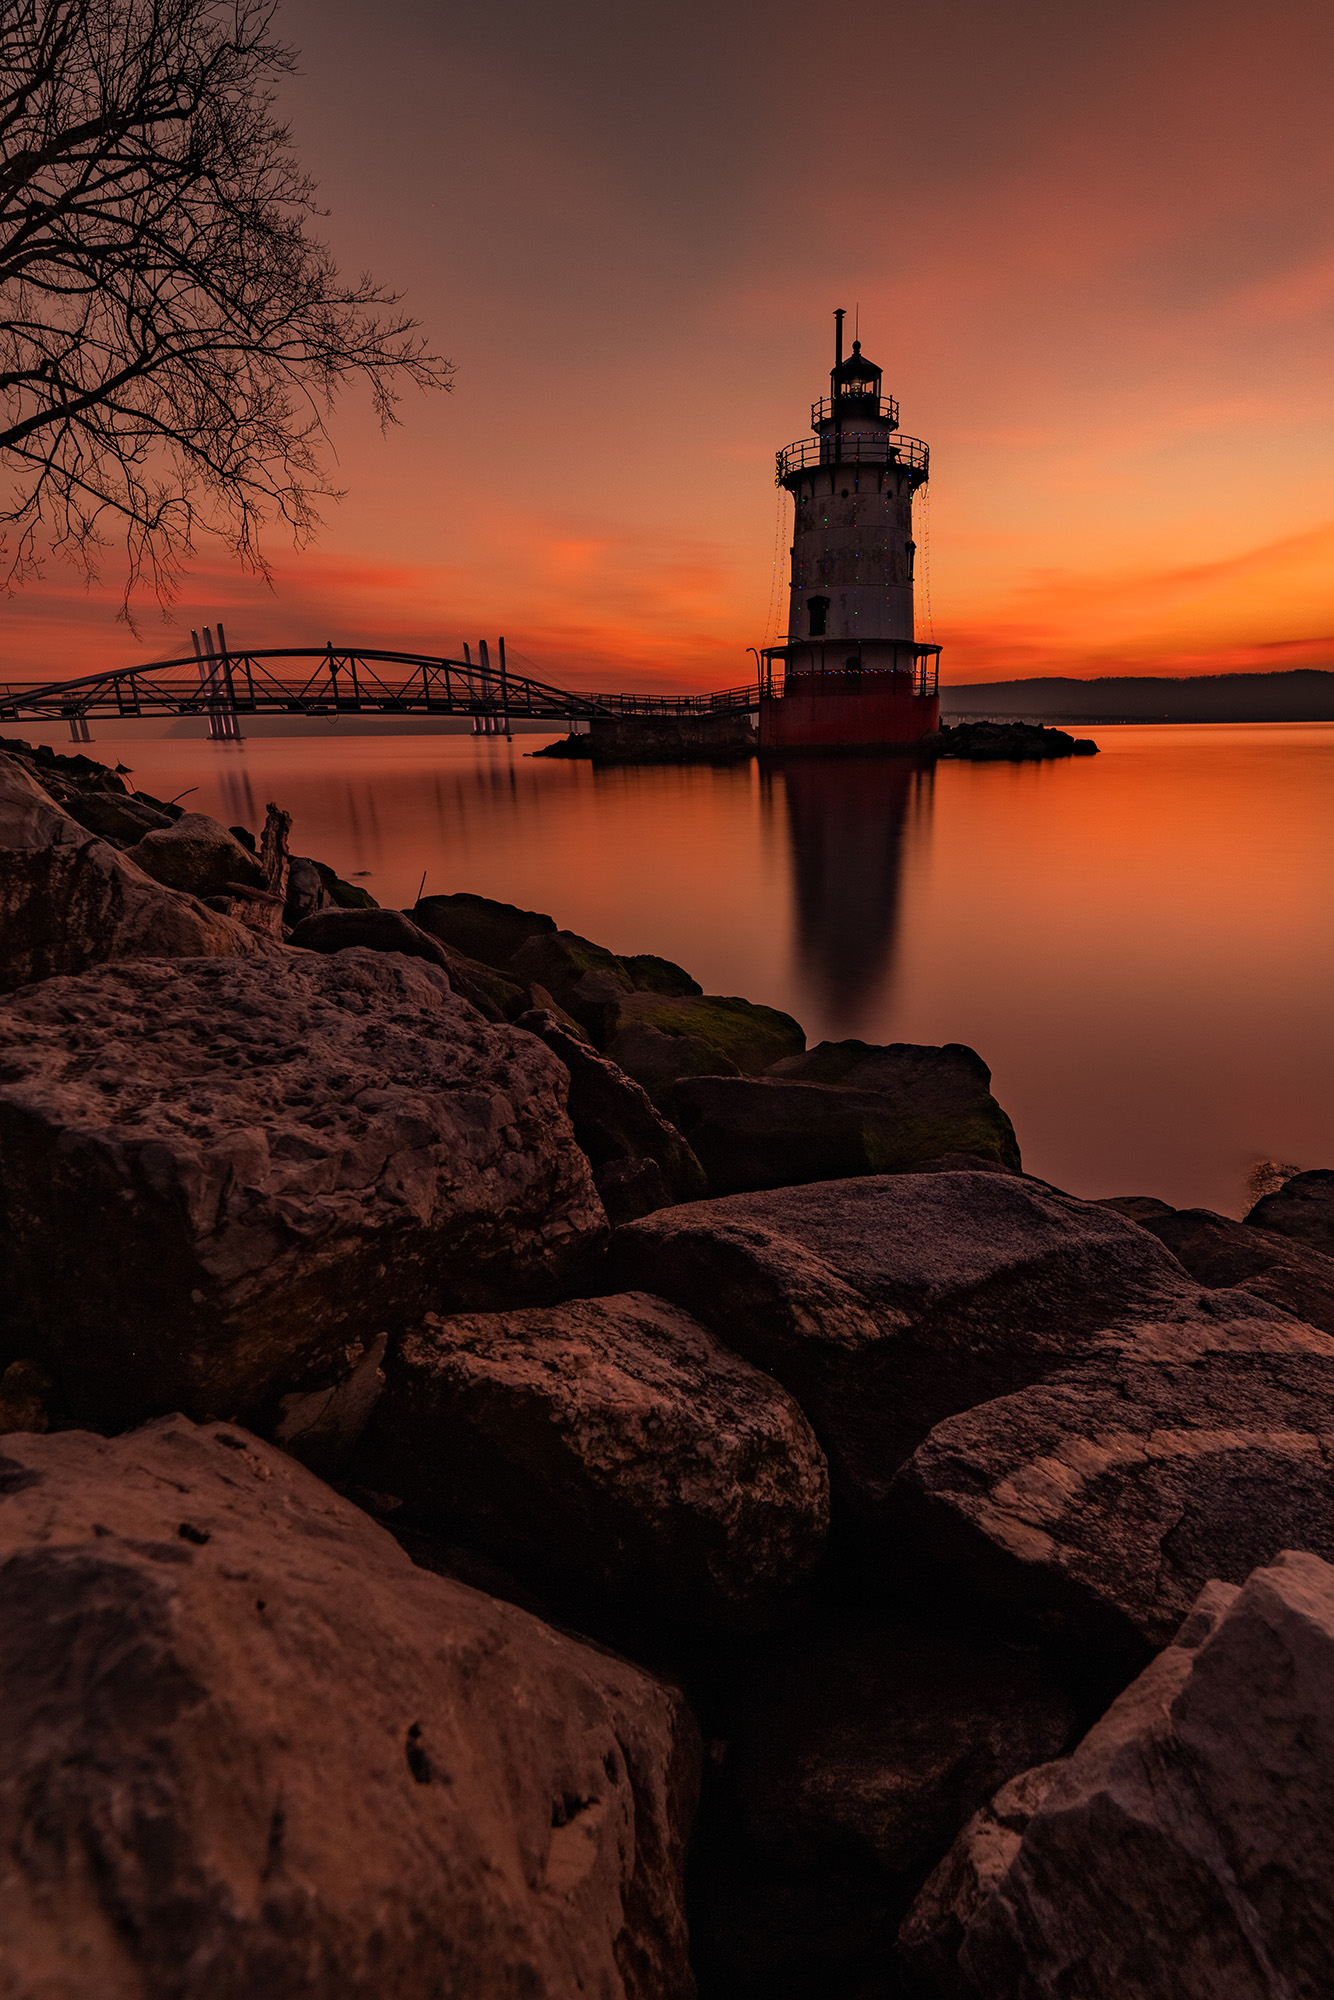
The SIGMA 14-24mm F2.8 DG HSM | Art, SIGMA 24-70mm F2.8 DG OS HSM | Art and the SIGMA 24-105mm F4 DG OS HSM | Art are primarily used to capture basic sunrises and sunsets over a beach, lighthouse or a country scene. In these cases, I’ll choose a wide-angle lens so I can capture as much of the foreground elements as possible. There might be rocks, sand, or something appealing to have in my composition.
However, a standard zoom lens covers a lot of ground as you zoom in closer to your subject, and may work better for certain compositions. In some cases, I’ll have a foreground that looks too busy to the eye at 24mm, so I’ll zoom in to concentrate on the subject and the sun. It’s always best to try both your wide-angle and standard zoom lenses to compare the differences while you’re out on your adventure.
SIGMA 24-105mm F4 DG OS HSM | Art w/ 3-stop ND filter on Canon EOS R5 – 46mm, 1/13s, F22, ISO 100
Final Thoughts
Capturing the perfect sunset or the ideal alignment with an iconic landmark can be tough, and it’s a very competitive area of photography. There’s certainly a lot of talented photographers out there. But don’t be discouraged, and don’t worry so much about who else might have that same image!
Research your local geography, learn from other photographers, and most importantly, shoot as much as possible. With practice, knowledge and creativity, you’ll be able to capture truly unique alignments and compositions that help your photos stand out from the rest.
SIGMA 60-600mm DG OS HSM | Sports on Nikon D850 – 600mm, 1/1250s, F9, ISO 64
Great info!
OMG. This is amazing . love it.